加载中...
神经网络-搭建小实战
发表于:2022-08-11 | 分类: 视觉处理 Pytorch

神经网络搭建CIFAR10

1
2
3
4
5
6
7
8
9
10
11
12
13
14
15
16
17
18
19
20
21
22
23
24
25
26
27
28
29
30
31
32
33
34
35
36
37
38
39
40
41
42
43
44
45
46
47
48
49
50
51
52
53
54
55
56
57
# -*- coding: UTF-8 -*-  
# @Time : 2022/8/1 21:49
# @File : nn_seq.py
# @Software: PyCharm
import torch
from tensorboardX import SummaryWriter
from torch import nn
from torch.nn import Conv2d, MaxPool2d, Flatten, Linear, Sequential


class GHigher(nn.Module):
def __init__(self):
super(GHigher, self).__init__()
self.conv1 = Conv2d(3, 32, 5, padding=2)
self.maxpool1 = MaxPool2d(2)
self.conv2 = Conv2d(32, 32, 5, padding=2)
self.maxpool2 = MaxPool2d(2)
self.conv3 = Conv2d(32, 64, 5, padding=2)
self.maxpool3 = MaxPool2d(2)
self.flatten = Flatten()
self.linear1 = Linear(1024, 64)
self.linear2 = Linear(64, 10)
# Sequential
self.model = Sequential(
Conv2d(3, 32, 5, padding=2),
MaxPool2d(2),
Conv2d(32, 32, 5, padding=2),
MaxPool2d(2),
Conv2d(32, 64, 5, padding=2),
MaxPool2d(2),
Flatten(),
Linear(1024, 64),
Linear(64, 10)
)
def forward(self, x):
# x = self.conv1(x)
# x = self.maxpool1(x)
# x = self.conv2(x)
# x = self.maxpool2(x)
# x = self.conv3(x)
# x = self.maxpool3(x)
# x = self.flatten(x)
# x = self.linear1(x)
# x = self.linear2(x)
x = self.model(x)
return x


net_gh = GHigher()
print(net_gh)
# 检验网络是否正确
test = torch.ones((64, 3, 32, 32))
result = net_gh(test)
print(result.shape)
writer = SummaryWriter("logs_seq")
writer.add_graph(net_gh, test)
writer.close()

image-20220801224623577

网络模型的保存

1
2
3
4
5
6
7
8
import torch
import torchvision
# train_data = torchvision.datasets.ImageNet("./Image_Net", split='train', transform=torchvision.transforms.ToTensor())
vgg16 = torchvision.models.vgg16(pretrained=False)
# 保存方式1
torch.save(vgg16, "vgg16_method1.pth")
# 保存方式2
torch.save(vgg16.state_dict(), "vgg16_method2.pth")

image-20220802110550276

一般保存方式2比保存方式1所占的内存小,所以我们通常使用方式2保存

image-20220802160929976

网络模型的加载

1
2
3
4
5
6
7
8
9
10
11
12
import torch
import torchvision

vgg16 = torchvision.models.vgg16(pretrained=False)
# 加载方式1
model1 = torch.load("vgg16_method1.pth")
print(model1)
# 加载方式2
model2 = torch.load("vgg16_method2.pth")
print(model2)
vgg16.load_state_dict(model2)
print(vgg16)

model1返回

1
2
3
4
5
6
7
8
9
10
11
12
13
14
15
16
17
18
19
20
21
22
23
24
25
26
27
28
29
30
31
32
33
34
35
36
37
38
39
40
41
42
43
44
45
VGG(
(features): Sequential(
(0): Conv2d(3, 64, kernel_size=(3, 3), stride=(1, 1), padding=(1, 1))
(1): ReLU(inplace=True)
(2): Conv2d(64, 64, kernel_size=(3, 3), stride=(1, 1), padding=(1, 1))
(3): ReLU(inplace=True)
(4): MaxPool2d(kernel_size=2, stride=2, padding=0, dilation=1, ceil_mode=False)
(5): Conv2d(64, 128, kernel_size=(3, 3), stride=(1, 1), padding=(1, 1))
(6): ReLU(inplace=True)
(7): Conv2d(128, 128, kernel_size=(3, 3), stride=(1, 1), padding=(1, 1))
(8): ReLU(inplace=True)
(9): MaxPool2d(kernel_size=2, stride=2, padding=0, dilation=1, ceil_mode=False)
(10): Conv2d(128, 256, kernel_size=(3, 3), stride=(1, 1), padding=(1, 1))
(11): ReLU(inplace=True)
(12): Conv2d(256, 256, kernel_size=(3, 3), stride=(1, 1), padding=(1, 1))
(13): ReLU(inplace=True)
(14): Conv2d(256, 256, kernel_size=(3, 3), stride=(1, 1), padding=(1, 1))
(15): ReLU(inplace=True)
(16): MaxPool2d(kernel_size=2, stride=2, padding=0, dilation=1, ceil_mode=False)
(17): Conv2d(256, 512, kernel_size=(3, 3), stride=(1, 1), padding=(1, 1))
(18): ReLU(inplace=True)
(19): Conv2d(512, 512, kernel_size=(3, 3), stride=(1, 1), padding=(1, 1))
(20): ReLU(inplace=True)
(21): Conv2d(512, 512, kernel_size=(3, 3), stride=(1, 1), padding=(1, 1))
(22): ReLU(inplace=True)
(23): MaxPool2d(kernel_size=2, stride=2, padding=0, dilation=1, ceil_mode=False)
(24): Conv2d(512, 512, kernel_size=(3, 3), stride=(1, 1), padding=(1, 1))
(25): ReLU(inplace=True)
(26): Conv2d(512, 512, kernel_size=(3, 3), stride=(1, 1), padding=(1, 1))
(27): ReLU(inplace=True)
(28): Conv2d(512, 512, kernel_size=(3, 3), stride=(1, 1), padding=(1, 1))
(29): ReLU(inplace=True)
(30): MaxPool2d(kernel_size=2, stride=2, padding=0, dilation=1, ceil_mode=False)
)
(avgpool): AdaptiveAvgPool2d(output_size=(7, 7))
(classifier): Sequential(
(0): Linear(in_features=25088, out_features=4096, bias=True)
(1): ReLU(inplace=True)
(2): Dropout(p=0.5, inplace=False)
(3): Linear(in_features=4096, out_features=4096, bias=True)
(4): ReLU(inplace=True)
(5): Dropout(p=0.5, inplace=False)
(6): Linear(in_features=4096, out_features=1000, bias=True)
)
)

model2返回为字典类型

1
2
3
4
5
6
7
8
9
10
11
12
13
14
15
OrderedDict([('features.0.weight', tensor([[[[-4.1368e-02,  1.2598e-02, -3.7834e-03],
[ 2.3529e-02, 4.8841e-02, -3.7602e-02],
[ 3.2726e-02, 5.5254e-02, 6.1646e-02]],

[[ 3.3375e-02, -9.8072e-02, 3.3444e-02],
[-3.6574e-02, -5.2286e-02, -8.1664e-03],
[-3.8757e-02, 3.0309e-02, 9.3537e-03]],

[[ 6.7703e-03, -2.8736e-02, -1.2290e-02],
[ 3.2700e-02, -4.2516e-02, -2.9173e-02],
[-1.2818e-01, -1.7044e-02, 3.0051e-02]]],


[[[ 5.4985e-02, -6.2916e-03, 6.8897e-02],
.....]))])

通常我们保存使用方式2,加载使用vgg16.load_state_dict(model2)这种方式,

print(vgg16)model1

注意!!!

1
2
3
4
5
6
7
8
9
10
11
class conv(nn.Module):
def __init__(self):
super(conv, self).__init__()
self.conv1 = Conv2d(3, 32, kernel_size=3)

def forward(self, x):
return self.conv1(x)


test = conv()
torch.save(test, "conv_method.pth")

当我们自己定义神经网络,保存之后,再在另一个文件加载是会报错,找不到自己定义的类

AttributeError: Can't get attribute 'conv' on <module '__main__' from 'C:/Users/25354/Desktop/Python/pytorch/model_load.py'>

解决方法

1
2
3
4
5
6
7
8
9
10
import torch

from model_save import *
test_model = torch.load("conv_method.pth")
print(test_model)
"""
conv(
(conv1): Conv2d(3, 32, kernel_size=(3, 3), stride=(1, 1))
)
"""

完整的模型训练套路(以CIFAR10数据集)

1
2
3
4
5
6
7
8
9
10
11
12
13
14
15
16
17
18
19
20
21
22
23
24
25
26
27
28
29
30
31
32
33
34
35
36
37
38
39
40
41
42
43
44
45
46
47
48
49
50
51
52
53
54
55
56
57
58
59
60
61
62
63
64
65
66
67
68
69
70
71
72
73
74
75
76
77
78
79
80
81
82
83
84
85
86
87
88
89
90
91
92
93
94
95
96
97
import torch
import torchvision
from torch import nn
from tensorboardX import SummaryWriter
from torch.nn import Conv2d, MaxPool2d, Flatten, Linear, Sequential
from torch.utils.data import DataLoader

train_data = torchvision.datasets.CIFAR10("./datasets", train=True, transform=torchvision.transforms.ToTensor())
test_data = torchvision.datasets.CIFAR10("./datasets", train=False, transform=torchvision.transforms.ToTensor())
# length长度
train_data_size = len(train_data)
test_data_size = len(test_data)
print("训练数据集的长度为:{}".format(train_data_size))
print("测试数据集的长度为:{}".format(test_data_size))
# 利用DataLoader来加载数据集
train_dataloader = DataLoader(train_data, batch_size=64)
test_dataloader = DataLoader(test_data, batch_size=64)


# 搭建神经网络
class cifiar(nn.Module):
def __init__(self):
super(cifiar, self).__init__()
# Sequential
self.model = Sequential(
Conv2d(3, 32, 5, padding=2),
MaxPool2d(2),
Conv2d(32, 32, 5, padding=2),
MaxPool2d(2),
Conv2d(32, 64, 5, padding=2),
MaxPool2d(2),
Flatten(),
Linear(1024, 64),
Linear(64, 10)
)

def forward(self, x):
x = self.model(x)
return x


# 创建网络模型
nn_cifai = cifiar()

# 损失函数
loss_fn = nn.CrossEntropyLoss()

# 优化器
learning_rate =1e-2
optimizer = torch.optim.SGD(nn_cifai.parameters(), lr=learning_rate)

# 设置训练网络的一些参数
# 记录训练的次数
total_train_step = 0
total_test_step = 0
# 训练的论数
epoch = 10

# 添加tensorboard
writer = SummaryWriter("log_train")

for i in range(epoch):
print("---------第{}轮训练开始---------".format(i+1))
# 训练步骤开始
for data in train_dataloader:
img, target = data
output = nn_cifai(img)
loss = loss_fn(output, target)
optimizer.zero_grad()
loss.backward()
optimizer.step()

total_train_step = total_train_step + 1
if total_train_step % 100 == 0:
print("训练次数:{}, Loss:{}".format(total_train_step, loss.item()))
writer.add_scalar("train_loss", loss.item(), total_train_step)

# 测试步骤开始
total_test_loss = 0
total_accuracy = 0
with torch.no_grad():
for data in test_dataloader:
img, target = data
output = nn_cifai(img)
loss = loss_fn(output, target)
total_test_loss = total_test_loss + loss.item()
accuray = (output.argmax(1)==target).sum()
total_accuracy = total_accuracy + accuray
print("整体测试集上的Loss:{}".format(total_test_loss))
print("整体测试集的正确率:{}".format(total_accuracy/test_data_size))
writer.add_scalar("test_loss", total_test_loss, total_train_step)
total_test_step += 1

# torch.save(nn_cifai, "cifar_{}.pth".format(i))
print("模型已保存")

writer.close()

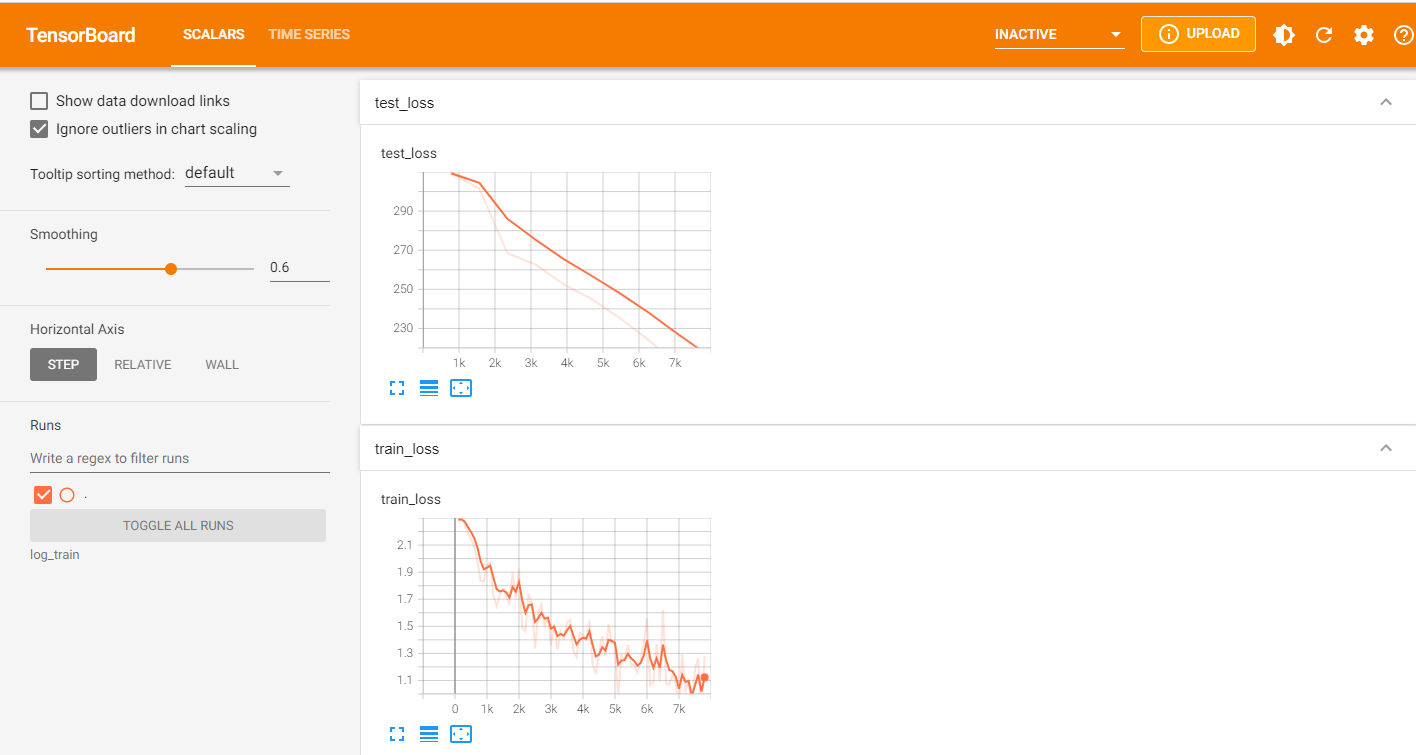
image-20220802205624078

利用GPU训练

电脑存在GPU

只需修改以下几项即可

  • 网络模型
  • 损失函数
  • 数据(输入,标注)

两种方法

①后缀加.cuda()

1
2
3
4
5
6
7
8
9
10
# 网络模型
if torch.cuda.is_available():
nn_cifai = nn_cifai.cuda()
# 损失函数
if torch.cuda.is_available():
loss_fn = loss_fn.cuda()
# 数据(输入,标注)
if torch.cuda.is_available():
img = img.cuda()
target = target.cuda()

②后缀加.to(device)

1
2
3
4
5
6
7
#定义训练的设备,如果gpu存在这样gpu否则用cpu
device = torch.device("cuda" if torch.cuda.is_available() else "cpu")

nn_cifai = nn_cifai.to(device)
loss_fn = loss_fn.to(device)
img = img.to(device)
target = target.to(device)

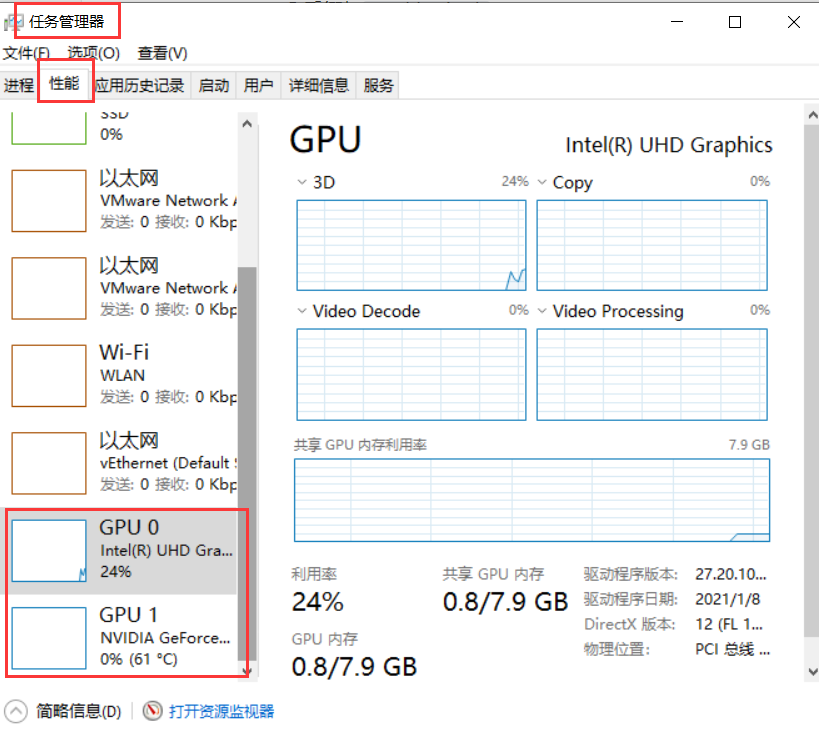
如果电脑上有多个GPU,"cuda"可以写为"cuda:0""cuda:1"…..

任务管理器->性能可以查看

image-20220802212554435

电脑不存在GPU

在线GPU

通过测试发现

  • GPU运行时间为169.24s
  • CPU运行时间为788.99s

因此可以得出采用GPU训练可以大大提高运行时间

完整的模型验证套路

利用已经训练好的模型,然后它提供输入

1
2
3
4
5
6
7
8
9
10
11
12
13
14
15
16
17
18
19
20
21
22
23
24
25
26
27
28
29
30
31
32
33
34
35
36
37
38
39
40
41
42
43
44
45
46
47
48
49
50
51
52
53
54
55
56
57
58
59
60
61
62
63
64
65
66
67
68
69
70
71
72
73
74
75
76
# -*- coding: UTF-8 -*-  
# @Time : 2022/8/2 21:28
# @File : test.py.py
# @Software: PyCharm
import torch
import torchvision
from PIL import Image
from torch import nn
from torch.nn import Conv2d, MaxPool2d, Flatten, Linear, Sequential

train_label = ['airplane', 'automobile', 'bird', 'cat', 'deer', 'dog', 'frog', 'horse', 'ship', 'truck']
img_path = "airplane1.jpg"
img1_path = "truck.png"
image = Image.open(img1_path)
image = image.convert("RGB")
print(image)

transform = torchvision.transforms.Compose([torchvision.transforms.Resize((32, 32)),
torchvision.transforms.ToTensor()])
image = transform(image)
print(image.shape)

# 搭建神经网络
class cifiar(nn.Module):
def __init__(self):
super(cifiar, self).__init__()
# Sequential
self.model = Sequential(
Conv2d(3, 32, 5, padding=2),
MaxPool2d(2),
Conv2d(32, 32, 5, padding=2),
MaxPool2d(2),
Conv2d(32, 64, 5, padding=2),
MaxPool2d(2),
Flatten(),
Linear(1024, 64),
Linear(64, 10)
)

def forward(self, x):
x = self.model(x)
return x


model = torch.load("cifar_30.pth", map_location=torch.device("cpu"))
print(model)
image = torch.reshape(image, (1, 3, 32, 32))
model.eval()
with torch.no_grad():
output = model(image)
print(output)
index = output.argmax(1).item()
print(index, train_label[index])
"""
<PIL.Image.Image image mode=RGB size=416x380 at 0x24E8447A820>
torch.Size([3, 32, 32])
cifiar(
(model): Sequential(
(0): Conv2d(3, 32, kernel_size=(5, 5), stride=(1, 1), padding=(2, 2))
(1): MaxPool2d(kernel_size=2, stride=2, padding=0, dilation=1, ceil_mode=False)
(2): Conv2d(32, 32, kernel_size=(5, 5), stride=(1, 1), padding=(2, 2))
(3): MaxPool2d(kernel_size=2, stride=2, padding=0, dilation=1, ceil_mode=False)
(4): Conv2d(32, 64, kernel_size=(5, 5), stride=(1, 1), padding=(2, 2))
(5): MaxPool2d(kernel_size=2, stride=2, padding=0, dilation=1, ceil_mode=False)
(6): Flatten(start_dim=1, end_dim=-1)
(7): Linear(in_features=1024, out_features=64, bias=True)
(8): Linear(in_features=64, out_features=10, bias=True)
)
)
tensor([[-0.7932, 1.5045, -0.6240, 1.7350, -5.7618, 0.1339, -0.3017, -2.6942,
0.0614, 5.5677]])
9 truck

Process finished with exit code 0

"""
上一篇:
Matlab学习02
下一篇:
torchvision中的数据集使用
本文目录
本文目录