C++提高编程——模板/容器 本阶段主要针对C++泛型编程和STL技术做详细讲解,探讨C++更深层的使用
模板 模板的概念 模板就是建立通用的模具,大大提高复用性。
函数模板
C++另一种编程思想称为泛型编程 ,主要利用的技术就是模板
C++提供两种模板机制:函数模板和类模板
函数模板语法 函数模板作用:
建立一个通用函数,其函数返回值类型和形参类型可以不具体制定,用一个虚拟的类型 来代表。
语法:
解释:
template —-声明创建模板typename —-表面其后面的符号是一种数据类型,可以用class代替T—-通用的数据类型,名称可以替换,通常为大写字母
eg:
普通写法
1 2 3 4 5 6 7 8 9 10 11 12 13 14 15 16 17 18 19 20 21 22 23 24 25 26 27 28 29 30 31 32 33 34 35 36 37 #include <iostream> using namespace std;void Swap_Int (int &a, int &b) int t = a; a = b; b = t; } void Swap_Double (double &a, double &b) double t = a; a = b; b = t; } void test01 () int a = 10 , b = 20 ; cout<<"Before Swap_Int" <<endl; cout<<"a = " <<a<<endl; cout<<"b = " <<b<<endl; Swap_Int (a, b); cout<<"After Swap_Int" <<endl; cout<<"a = " <<a<<endl; cout<<"b = " <<b<<endl; double x = 3.14 , y = 2.15 ; cout<<"Before Swap_Double" <<endl; cout<<"x = " <<x<<endl; cout<<"y = " <<y<<endl; Swap_Double (x, y); cout<<"After Swap_Double" <<endl; cout<<"x = " <<x<<endl; cout<<"y = " <<y<<endl; } int main () test01 (); return 0 ; }
模板方式:
1 2 3 4 5 6 7 8 9 10 11 12 13 14 15 16 17 18 19 20 21 22 23 24 25 26 27 28 29 30 31 32 33 34 35 36 37 38 39 40 41 42 43 44 45 46 47 48 template <typename T>void MySwap (T &a, T &b) T t = a; a = b; b = t; } void test02 () int a = 10 , b = 20 ; cout<<"Before MySwap" <<endl; cout<<"a = " <<a<<endl; cout<<"b = " <<b<<endl; MySwap (a, b); cout<<"After MySwap" <<endl; cout<<"a = " <<a<<endl; cout<<"b = " <<b<<endl; double x = 3.14 , y = 2.15 ; cout<<"Before MySwap" <<endl; cout<<"x = " <<x<<endl; cout<<"y = " <<y<<endl; MySwap<double >(x, y); cout<<"After MySwap" <<endl; cout<<"x = " <<x<<endl; cout<<"y = " <<y<<endl; } int main () test02 (); return 0 ; } Before MySwap a = 10 b = 20 After MySwap a = 20 b = 10 Before MySwap x = 3.14 y = 2.15 After MySwap x = 2.15 y = 3.14
注意事项:
自动类型推导,必须推导出一致的数据类型T,才可以使用
模板必须要确定出T的数据类型,才可以使用
1 2 3 4 5 6 7 8 9 10 11 12 13 14 15 16 17 18 19 20 21 22 23 template <class T >void MySwap (T &a, T &b) T t = a; a = b; b = t; } void test03 () int a = 10 , b = 20 ; cout<<"Before MySwap" <<endl; cout<<"a = " <<a<<endl; cout<<"b = " <<b<<endl; MySwap (a, b); cout<<"After MySwap" <<endl; cout<<"a = " <<a<<endl; cout<<"b = " <<b<<endl; } int main () test03 (); return 0 ; }
总结:
使用模板时必须确定出通用数据类型T,并且能够推导出一致的类型
函数模板案例 案例描述:
利用函数模板封装一个排序的函数,可以对不同数据类型数组进行排序
排序规则从大到小,排序算法为选择排序
分别利用char数组和int数组进行测试
1 2 3 4 5 6 7 8 9 10 11 12 13 14 15 16 17 18 19 20 21 22 23 24 25 26 27 28 29 30 31 32 33 34 35 36 37 38 39 40 41 42 43 44 45 46 47 48 49 50 51 52 53 54 55 56 57 58 59 60 61 62 63 64 65 66 67 68 69 70 71 72 #include <iostream> using namespace std;template <class S>void Sort (S &a, S &b) S t = a; a = b; b = t; } template <class T >void MySort (T arr[], int len) for (int i=0 ;i<len-1 ;i++) { int max = i; for (int j=i+1 ;j<len;j++) { if (arr[max]<arr[j]) { max = j; } } if (max != i) { Sort (arr[i], arr[max]); } } } template <class P>void Printf_Arr (P arr[], int len) for (int i=0 ; i<len; i++) { cout<<arr[i]<<" " ; } cout<<endl; } void Test01 () char charArr[] = "bsagc" ; int length = sizeof sizeof char ); Printf_Arr (charArr, length); MySort (charArr, length); cout<<"sort....." <<endl; Printf_Arr (charArr, length); } void Test02 () int numArr[] = {3 , 1 , 8 , 5 , 9 , 7 , 4 }; int length = sizeof sizeof int ); Printf_Arr (numArr, length); MySort (numArr, length); cout<<"sort....." <<endl; Printf_Arr (numArr, length); } int main () cout<<"Test01" <<endl; Test01 (); cout<<"Test02" <<endl; Test02 (); return 0 ; } Test01 b s a g c sort..... s g c b a Test02 3 1 8 5 9 7 4 sort..... 9 8 7 5 4 3 1
普通函数与函数模板的区别 普通函数与函数模板区别:
普通函数调用时可以发生自动类型转换(隐式类型转换)
函数模板调用时,如果利用自动类型推导,不会发生隐式类型转换
如果利用显示指定类型的方式,可以发生隐式类型转换
1 2 3 4 5 6 7 8 9 10 11 12 13 14 15 16 17 18 19 20 21 22 int Add (int a, int b) return a + b; } void test01 () char a = 'a' ; int b = 5 ; cout<<Add (a, b)<<endl; cout<<"MyAdd<int>(a, b)" <<endl; cout<<MyAdd<int >(a, b)<<endl; } int main () test01 (); return 0 ; } 102 MyAdd<int >(a, b) 102
普通函数模板与函数模板的调用规则 调用规则如下:
如果函数模板和普通函数都可以实现,优先调用普通函数
可以通过空模板参数列表来强制调用函数模板
函数模板也可以发生重载
如果函数模板可以产生更好的匹配,优先调用函数模板
模板的局限性 局限性:
eg:
1 2 3 4 5 template <class T>void f (T a, T b) a + b; }
在上述代码中提供的赋值操作,如果传入的a和b是一个数组,就无法实现了
eg:
1 2 3 4 5 template <class T>void f (T a, T b) if (a>b){....} }
在上述代码中,如果T的数据类型传入的是像Person这样的自定义数据类型,也无法正常运行
因此C++为了解决这种问题,提供模板的重载,可以为这些特定的类型提供具体化的模板
1 2 3 4 5 6 7 8 9 10 11 12 13 14 15 16 17 18 19 20 21 22 23 24 25 26 27 28 29 30 31 32 33 34 35 36 37 38 39 40 41 42 43 44 45 46 47 48 49 50 51 52 53 54 55 56 57 58 59 60 61 62 63 64 65 66 67 68 69 70 71 72 73 class Person { public : Person (string name, int age) { this ->P_name = name; this ->P_age = age; } string P_name; int P_age; }; template <class T>bool MyCompare (T &a, T &b) if (a == b) { return true ; } else { return false ; } } template <> bool MyCompare (Person &a, Person &b) { if (a.P_age == b.P_age) { return true ; } else { return false ; } } } void test01 () int a = 10 , b = 20 ; bool res = MyCompare (a, b); if (res) { cout<<"两数相等" <<endl; } else { cout<<"两数不相等" <<endl; } } void test02 () Person a ("Daming" , 18 ) ; Person b ("Lilei" , 19 ) ; bool res = MyCompare (a, b); if (res) { cout<<"a = b" <<endl; } else { cout<<"a != b" <<endl; } } int main () test01 (); test02 (); return 0 ; } 两数不相等 a != b
总结:
利用具体化的模板,可以解决自定义类型的通用化
学习模板并不是为了写模板,而是在STL能够运用系统提供的模板
类模板 类模板语法 类模板作用:
建立一个通用类,类中的成员数据类型可以不具体制定,用一个虚拟的类型来代表。
语法:
1 2 3 4 5 6 7 8 9 10 11 12 13 14 15 16 17 18 19 20 21 22 template <class NameType , class AgeType >class Person { public : Person (NameType name, AgeType age) { this ->P_name = name; this ->P_age = age; } void ShowPerson () { cout<<"Name:" <<this ->P_name<<" Age:" <<this ->P_age<<endl; } string P_name; int P_age; }; int main () Person<string, int > a ("Daming" , 18 ) ; a.ShowPerson (); return 0 ; }
类模板中成员函数的创建时机 类模板中成员函数和普通类中成员函数创建时机是有区别的:
普通类中的成员函数—开始就可以创建
类模板中的成墨函数在调用时才创建
1 2 3 4 5 6 7 8 9 10 11 12 13 14 15 16 17 18 19 20 21 22 23 24 25 26 27 28 29 30 31 32 33 34 35 36 37 38 39 40 41 class Person1 { public : void ShowPerson1 () { cout<<"Person1" <<endl; } }; class Person2 { public : void ShowPerson2 () { cout<<"Person2" <<endl; } }; template <class T >class MyClass { public : T obj; void func1 () { obj.ShowPerson1 (); } void func2 () { obj.ShowPerson2 (); } }; int main () MyClass<Person1> p; p.func1 (); return 0 ; } Person1
类模板对象做函数参数 学习目标:
类模板实例化出的对象,向函数传参的方式。
三种传入方式:
指定传入的类型—-直接显示对象的数据类型
参数模板化—-将对象中的参数变为模板进行传递
整个类模板化干-将这个对象类型模板化进行传递
1 2 3 4 5 6 7 8 9 10 11 12 13 14 15 16 17 18 19 20 21 22 23 24 25 26 27 28 29 30 31 32 33 34 35 36 37 38 39 40 41 42 43 44 45 46 47 48 49 50 51 52 53 54 55 56 57 58 59 60 61 62 63 64 65 66 template <class T1 , class T2 >class Person { public : Person (T1 name, T2 age) { this ->m_Name = name; this ->m_Age = age; } void show_person () { cout<<"姓名:" <<this ->m_Name<<" 年龄:" <<this ->m_Age<<endl; } T1 m_Name; T2 m_Age; }; void PrintPerson ( Person<string, int > &p) p.show_person (); } void test01 () Person<string, int > p ("孙悟空" , 110 ) ; PrintPerson (p); } template <class T1 , class T2 >void PrintPerson2 ( Person<T1, T2> &p) p.show_person (); cout<<"T1的类型:" <<typeid name ()<<endl; cout<<"T2的类型:" <<typeid name ()<<endl; } void test02 () Person<string, int > p ("猪八戒" , 100 ) ; PrintPerson2 (p); } template <class T >void PrintPerson3 (T &p) p.show_person (); cout<<"T的类型:" <<typeid name ()<<endl; } void test03 () Person<string, int > p ("唐僧" , 45 ) ; PrintPerson3 (p); } int main () test01 (); test02 (); test03 (); return 0 ; } 姓名:孙悟空 年龄:110 姓名:猪八戒 年龄:100 T1的类型:NSt7__cxx1112basic_stringIcSt11char_traitsIcESaIcEEE T2的类型:i 姓名:唐僧 年龄:45 T的类型:6 PersonINSt7__cxx1112basic_stringIcSt11char_traitsIcESaIcEEEiE
总结:
通过类模板创建的对象,可以有三种方式向函数中进行传参
使用比较广泛是第一种:指定传入的类型
类模板与继承 当类模板碰到继承时,需要注意一下几点:
当子类继承的父类是一个类模板时,子类在声明的时候,要指定出父类中T的类型
如果不指定,编译器无法给子类分配内存
如果想灵活指定出父类中T的类型,子类也需变为类模板
1 2 3 4 5 6 7 8 9 10 11 12 13 14 15 16 17 18 19 20 21 22 23 24 25 26 27 28 29 30 template <class T >class Base { public : T m; }; class Son1 :public Base<int >{ }; void test01 () Son1 s1; } template <class T1 , class T2 >class Son2 :public Base<T2>{ T1 obj; }; void test02 () Son2<int , string> s2; } int main () test01 (); test02 (); return 0 ; }
类模板函数的类外实现 1 2 3 4 5 6 7 8 9 10 11 12 13 14 15 16 17 18 19 20 21 22 23 24 25 26 27 28 29 30 31 32 33 34 35 template <class T1 ,class T2 >class Person { public : Person (T1 name, T2 age); void showPerson () T1 m_Name; T2 m_Age; }; template <class T1 ,class T2 >Person<T1, T2>::Person (T1 name, T2 age) { this ->m_Name = name; this ->m_Age = age; } template <class T1 ,class T2 >void Person<T1, T2>::showPerson (){ cout<<"姓名:" <<this ->m_Name<<" 年龄:" <<this ->m_Age<<endl; } int main () Person<string, int > p ("大明" , 18 ) ; p.showPerson (); return 0 ; }
类模板分文件编写 第一种解决方式将.h头文件改为.cpp源文件
person.h
1 2 3 4 5 6 7 8 9 10 11 12 13 14 15 #ifndef MODULE_STL_PERSON_H #define MODULE_STL_PERSON_H #include <iostream> #include <string> using namespace std;template <class T1 ,class T2 >class Person { public : Person (T1 name, T2 age); void showPerson () T1 m_Name; T2 m_Age; }; #endif
person.cpp
1 2 3 4 5 6 7 8 9 10 11 12 13 14 #include "person.h" template <class T1 ,class T2 >Person<T1, T2>::Person (T1 name, T2 age) { this ->m_Name = name; this ->m_Age = age; } template <class T1 ,class T2 >void Person<T1, T2>::showPerson (){ cout<<"姓名:" <<this ->m_Name<<" 年龄:" <<this ->m_Age<<endl; }
main.cpp
1 2 3 4 5 6 7 8 9 10 11 12 #include <iostream> #include <string> #include "person.cpp" using namespace std;int main () Person<string, int > p ("大明" , 18 ) ; p.showPerson (); return 0 ; }
第二种解决方式将.h头文件和.cpp源文件结合后缀改为.hpp文件
person.hpp
1 2 3 4 5 6 7 8 9 10 11 12 13 14 15 16 17 18 19 20 21 22 23 24 #include <iostream> #include <string> using namespace std;template <class T1 ,class T2 >class Person { public : Person (T1 name, T2 age); void showPerson () T1 m_Name; T2 m_Age; }; template <class T1 ,class T2 >Person<T1, T2>::Person (T1 name, T2 age) { this ->m_Name = name; this ->m_Age = age; } template <class T1 ,class T2 >void Person<T1, T2>::showPerson (){ cout<<"姓名:" <<this ->m_Name<<" 年龄:" <<this ->m_Age<<endl; }
main.cpp
1 2 3 4 5 6 7 8 9 10 11 12 #include <iostream> #include <string> #include "person.hpp" using namespace std;int main () Person<string, int > p ("大明" , 18 ) ; p.showPerson (); return 0 ; } 姓名:大明 年龄:18
类模板与友元 类模板案例 案例描述:实现一个通用的数组类,要求如下:
可以对内置数据类型以及自定义数据类型的数据进行存储
将数组中的数据存储到堆区
构造函数中可以传入数组的容量
提供对应的拷贝构造函数以及operator=防止浅拷贝问题
提供尾插法和尾删法对数组中的数据进行增加和删除
可以通过下标的方式访问数组中的元素
可以获取数组中当前元素个数和数组的容量
eg:
myArray.hpp
1 2 3 4 5 6 7 8 9 10 11 12 13 14 15 16 17 18 19 20 21 22 23 24 25 26 27 28 29 30 31 32 33 34 35 36 37 38 39 40 41 42 43 44 45 46 47 48 49 50 51 52 53 54 55 56 57 58 59 60 61 62 63 64 65 66 67 68 69 70 71 72 73 74 75 76 77 78 79 80 81 82 83 84 85 86 87 88 89 90 91 92 93 94 95 96 97 98 99 100 101 #ifndef MYARRAY_H #define MYARRAY_H #include "iostream" using namespace std;template <class T >class MyArray { public : MyArray (int capacity) { cout<<"MyArray的有参构造" <<endl; this ->m_Capacity = capacity; this ->m_Size = 0 ; this ->pAddress = new T[this ->m_Capacity]; } MyArray (const MyArray& arr) { cout<<"MyArray的拷贝构造" <<endl; this ->m_Capacity = arr.m_Capacity; this ->m_Size = arr.m_Size; this ->pAddress = new T[arr.m_Capacity]; for (int i=0 ; i<this ->m_Size;i++) { this ->pAddress[i] = arr.pAddress[i]; } } MyArray& operator =(const MyArray& arr) { cout<<"MyArray的operatot=" <<endl; if (this ->pAddress != NULL ) { delete [] this ->pAddress; this ->pAddress = NULL ; this ->m_Capacity = 0 ; this ->m_Size = 0 ; } this ->m_Capacity = arr.m_Capacity; this ->m_Size = arr.m_Size; this ->pAddress = new T[arr.m_Capacity]; for (int i=0 ; i<this ->m_Size;i++) { this ->pAddress[i] = arr.pAddress[i]; } return *this ; } void Push_Back (const T & val) { if (this ->m_Capacity == this ->m_Size) { return ; } this ->pAddress[this ->m_Size] = val; this ->m_Size++; } void Pop_Back () { if (this ->m_Size == 0 ) { return ; } this ->m_Size--; } T& operator [](int index) { return this ->pAddress[index]; } int GetCapacity () { return this ->m_Capacity; } int GetSize () { return this ->m_Size; } ~MyArray () { if (this ->pAddress != NULL ) { delete [] this ->pAddress; this ->pAddress = NULL ; } cout<<"MyArray的析构" <<endl; } private : T * pAddress; int m_Capacity; int m_Size; }; #endif
main.cpp
1 2 3 4 5 6 7 8 9 10 11 12 13 14 15 16 17 18 19 20 21 22 23 24 25 26 27 28 29 30 31 32 33 34 35 36 37 38 39 40 41 42 43 44 45 46 47 48 49 50 51 52 53 54 55 56 57 58 59 60 61 62 63 64 65 66 67 68 69 70 71 72 73 74 75 76 #include "MyArray.hpp" using namespace std;void PrintArr (MyArray<int >& arr) for (int i=0 ; i<arr.GetSize (); i++) { cout<<arr[i]<<endl; } } void test01 () MyArray<int > arr1 (5 ) ; for (int i=0 ;i<5 ;i++) { arr1.Push_Back (i); } cout<<"arr1的打印输出:" <<endl; PrintArr (arr1); cout<<"arr1的容量为:" <<arr1.GetCapacity ()<<endl; cout<<"arr1的大小为:" <<arr1.GetSize ()<<endl; MyArray<int > arr2 (arr1) ; arr2.Pop_Back (); cout<<"arr2的打印输出:" <<endl; PrintArr (arr2); cout<<"arr2尾删后" <<endl; cout<<"arr2的容量为:" <<arr2.GetCapacity ()<<endl; cout<<"arr2的大小为:" <<arr2.GetSize ()<<endl; } class Person { public : Person (){}; Person (string name, int age) { this ->m_Name = name; this ->m_Age = age; } string m_Name; int m_Age; }; void PrintPerson (MyArray<Person> &arr) for (int i=0 ; i<arr.GetSize (); i++) { cout<<"姓名:" <<arr[i].m_Name<<" 年龄:" <<arr[i].m_Age<<endl; } } void test02 () MyArray<Person> arr (7 ) ; Person p1 ("李白" , 35 ) ; Person p2 ("韩信" , 33 ) ; Person p3 ("赵云" , 30 ) ; Person p4 ("典韦" , 35 ) ; Person p5 ("亚瑟" , 34 ) ; arr.Push_Back (p1); arr.Push_Back (p2); arr.Push_Back (p3); arr.Push_Back (p4); arr.Push_Back (p5); PrintPerson (arr); cout<<"arr的容量为:" <<arr.GetCapacity ()<<endl; cout<<"arr的大小为:" <<arr.GetSize ()<<endl; } int main () cout<<"--------------test01()-------------" <<endl; test01 (); cout<<"--------------test02()-------------" <<endl; test02 (); return 0 ; }
STL STL基本概念
STL(Standard Template Library,标准模板库)
STL从广义上分为:容器(container)算法(algorithm)迭代器(iterator)
容器和算法之间通过迭代器进行无缝连接。
STL几乎所有的代码都采用了模板类或者模板函数
STL六大组件 STL大体分为六大组件,分别是:容器、算法、迭代器、仿函数、适配器(配接器).空间配置器。
容器:各种数据结构,如vector、list、deque、set、map等,用来存放数据。
算法:各种常用的算法,如sort、find、copy、for_each等
迭代器:扮演了容器与算法之间的胶合剂。
仿函数:行为类似函数,可作为算法的某种策略。
适配器:一种用来修饰容器或者仿函数或迭代器接口的东西。6.空间配置器:负责空间的配置与管理。
STL容器、算法、迭代器 常用的数据结构:数组,链表,树,栈,队列,集合,映射表 等
这些容器分为序列式容器和关联式容器两种:
列式容器:强调值的排序,序列式容器中的每个元素均有固定的位置。
关联式容器:二叉树结构,各元素之间没有严格的物理上的顺序关系
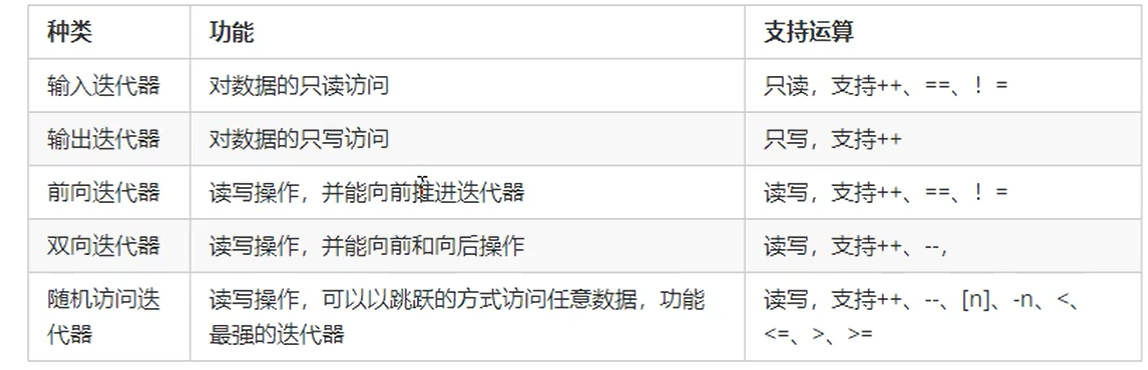
迭代器种类:
vector存放内置数据类型 容器:vector
算法:for_each
迭代器: vector<int>:iterator
第一种遍历方式
1 2 3 4 5 6 7 8 9 10 11 12 13 14 15 16 17 18 19 20 21 22 23 24 25 26 #include <vector> using namespace std;void test01 () vector<int > v; v.push_back (10 ); v.push_back (20 ); v.push_back (30 ); v.push_back (40 ); v.push_back (50 ); vector<int >::iterator itBegin = v.begin (); vector<int >::iterator itEnd = v.end (); while (itBegin != itEnd) { cout<<*itBegin<<endl; itBegin++; } } int main () test01 (); return 0 ; }
第二种遍历方式
1 2 3 4 for (vector<int >::iterator it = v.begin (); it != v.end (); it++){ cout<<*it<<endl; }
第三种遍历方式
1 2 3 4 5 6 7 8 9 10 11 12 13 14 15 16 17 18 19 20 21 22 23 24 25 26 27 28 29 30 #include <vector> #include <algorithm> using namespace std;void Print (int val) cout<<val<<endl; } void test01 () vector<int > v; v.push_back (10 ); v.push_back (20 ); v.push_back (30 ); v.push_back (40 ); v.push_back (50 ); for_each(v.begin (), v.end (), Print); } int main () test01 (); return 0 ; } 10 20 30 40 50
vector存放自定义数据类型 1 2 3 4 5 6 7 8 9 10 11 12 13 14 15 16 17 18 19 20 21 22 23 24 25 26 27 28 29 30 31 32 33 34 35 36 37 38 39 40 41 class Person { public : Person (string name, int age) { this ->Name = name; this ->Age = age; } string Name; int Age; }; void test01 () vector<Person> arr; Person p1 ("aaa" , 5 ) ; Person p2 ("hhh" , 9 ) ; Person p3 ("fff" , 7 ) ; Person p4 ("eee" , 13 ) ; Person p5 ("ddd" , 6 ) ; arr.push_back (p1); arr.push_back (p2); arr.push_back (p3); arr.push_back (p4); arr.push_back (p5); for (vector<Person>::iterator i=arr.begin ();i!=arr.end ();i++) { cout<<"姓名:" <<(*i).Name<<" 年龄:" <<(*i).Age<<endl; } } int main () test01 (); return 0 ; } 姓名:aaa 年龄:5 姓名:hhh 年龄:9 姓名:fff 年龄:7 姓名:eee 年龄:13 姓名:ddd 年龄:6
vector容器嵌套容器 1 2 3 4 5 6 7 8 9 10 11 12 13 14 15 16 17 18 19 20 21 22 23 24 25 26 27 28 29 30 31 32 33 34 35 36 37 38 39 40 void test01 () vector<vector<int >> arr; vector<int > v1; vector<int > v2; vector<int > v3; vector<int > v4; for (int i=0 ; i<4 ;i++) { v1.push_back (i); v2.push_back (i+1 ); v3.push_back (i+2 ); v4.push_back (i+3 ); } arr.push_back (v1); arr.push_back (v2); arr.push_back (v3); arr.push_back (v4); for (vector<vector<int >>::iterator i = arr.begin (); i != arr.end (); i++) { for (vector<int >::iterator j = (*i).begin (); j != (*i).end (); j++) { cout<<*j<<" " ; } cout<<endl; } } int main () test01 (); return 0 ; } 0 1 2 3 1 2 3 4 2 3 4 5 3 4 5 6
string构造函数 1 2 3 4 5 6 7 8 9 10 11 12 13 14 15 16 17 18 19 20 void test01 () string s1; const char * str = "hello c++" ; string s2 (str) ; cout<<"s2=" <<s2<<endl; string s3 (s2) ; cout<<"s3=" <<s3<<endl; string s4 (10 , 'a' ) ; cout<<"s4=" <<s4<<endl; } int main () test01 (); return 0 ; } s2=hello c++ s3=hello c++ s4=aaaaaaaaaa
string赋值操作 1 2 3 4 5 6 7 8 9 10 11 12 13 14 15 16 17 18 19 20 21 22 23 24 25 26 27 28 29 30 31 32 33 34 void test01 () string s1; s1 = "hello c++" ; cout<<"s1=" <<s1<<endl; string s2; s2 = s1; cout<<"s2=" <<s2<<endl; string s3; s3.assign ("hello world" ); cout<<"s3=" <<s3<<endl; string s4; s4.assign ("hello c++" , 5 ); cout<<"s4=" <<s4<<endl; string s5; s5.assign (s4); cout<<"s5=" <<s5<<endl; string s6; s6.assign (6 , 'w' ); cout<<"s6=" <<s6<<endl; } int main () test01 (); return 0 ; } s1=hello c++ s2=hello c++ s3=hello world s4=hello s5=hello s6=wwwwww
string查找和替换 1 2 3 4 5 6 7 8 9 10 11 12 13 14 15 16 17 18 19 void test01 () string str1 = "abcdefg" ; int pos = str1.find ("de" ); int pos1 = str1.find ("ade" ); cout<<"pos=" <<pos<<endl; cout<<"pos1=" <<pos1<<endl; str1.replace (1 , 3 , "hjk" ); cout<<"str1=" <<str1<<endl; } int main () test01 (); return 0 ; } pos=3 pos1=-1 str1=ahjkefg
string字符串比较 str1.compare(str2)
string字符存取 str1[index]