加载中...
不调用CV库实现图像的平移、镜像、旋转
发表于:2023-04-08 | 分类: 视觉处理 Opencv

Python实现图像的平移、镜像、旋转(不调用CV自身函数)

平移图像

图像的平移在几何变换中算是最简单的变换之一,话不多说,直奔主题

image-20230413220258017

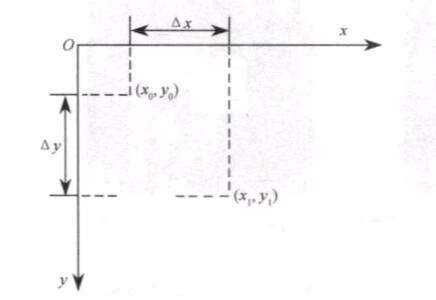
由图可知,在opencv中图像的原点一般为左上角,设初始坐标为$(x_{0}, x_{0})$的经过平移$(\bigtriangleup x, \bigtriangleup y)$后,坐标变为$(x_{1}, y_{1})$

则很容易得出两点之间的位置关系:

在python中我们可以使用简单for循环实现:

1
2
3
4
5
6
7
8
9
10
11
12
13
14
15
16
17
18
19
20
21
22
23
24
25
import cv2 as cv
import numpy as np


def show_Img(name, img):
cv.imshow(name, img)
cv.waitKey(0)
cv.destroyAllWindows()


def translate_img(img, move_y, move_x):
h, w, c = img.shape
translated_img = np.zeros((h, w, c), dtype=np.uint8)
for i in range(h):
for j in range(w):
if i >= move_y and j >= move_x:
translated_img[i, j] = img[i - move_y, j - move_x]
return translated_img


img = cv.imread("images/cat.jpg")
h, w, c = img.shape
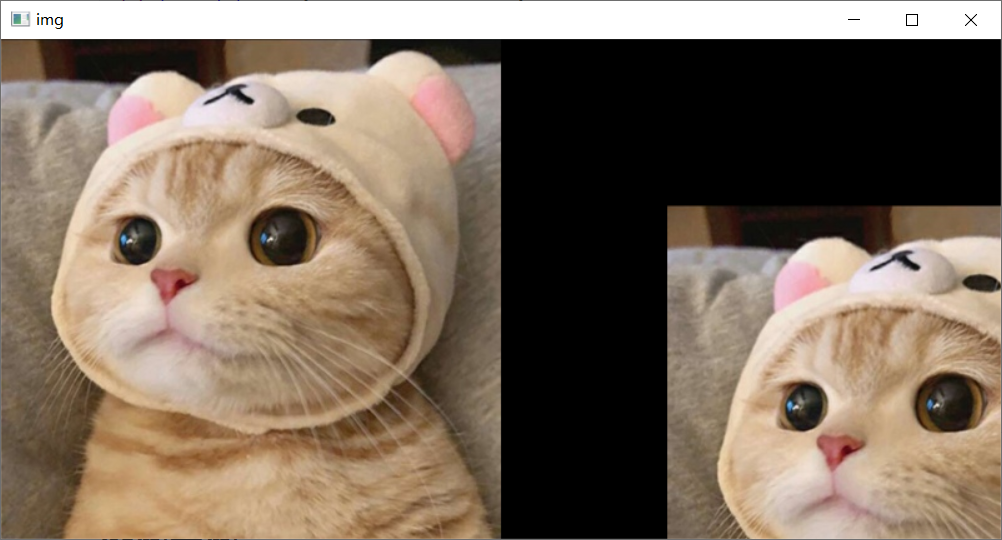
translated_img = translate_img(img, h // 3, w // 3)
img_all = np.hstack((img, translated_img))
show_Img("img", img_all)

image-20230413221349660

而通常我们一般是用矩阵形式表示:

python实现为:

1
2
3
4
5
6
7
8
9
10
11
def translate_image(image, move_x, move_y):
# 平移矩阵
translation_matrix = np.array([[1, 0, 0], [0, 1, 0], [move_x, move_y, 1]])
height, width = image.shape[:2]
translated_image = np.zeros([height, width, 3], dtype=np.uint8)
for y in range(height):
for x in range(width):
translated_x, translated_y, _ = np.dot([x, y, 1], translation_matrix)
if 0 <= translated_x < width and 0 <= translated_y < height:
translated_image[translated_y, translated_x] = image[y, x]
return translated_image

镜像图像

图像镜像也是最为常用的一种变换,镜像就是相对某一参照面旋转180°的图像,又通常成为对称变换。

这里主要介绍三种镜像方式:

  • 水平镜像
  • 垂直镜像
  • 斜对角线镜像

水平镜像

image-20230413222438042

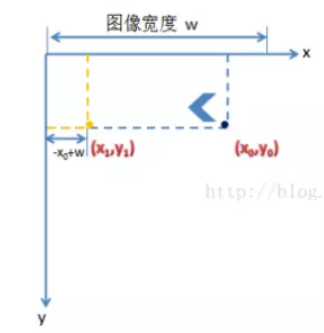
经数学分析得水平镜像后的x1与x0和为图像宽度,而y点不变,所以:

转换为矩阵得:

垂直镜像

同理:

斜对角线镜像

同理:

综上所述,用python实现为:

1
2
3
4
5
6
7
8
9
10
11
12
13
14
15
16
17
18
19
20
21
22
23
24
25
26
27
28
29
def flip_image(image, flip):
h, w = image.shape[:2]

fliped_image = np.zeros((h, w, 3), dtype=np.uint8)
# 矩阵的w-1和y-1是防止图片的索引值超出范围
if flip == "x":
flip_matrix = np.array([[-1, 0, 0], [0, 1, 0], [w - 1, 0, 1]])
elif flip == "y":
flip_matrix = np.array([[1, 0, 0], [0, -1, 0], [0, h - 1, 1]])
elif flip == "x-y":
flip_matrix = np.array([[-1, 0, 0], [0, -1, 0], [w - 1, h - 1, 1]])
else:
flip_matrix = np.array([[1, 0, 0], [0, 1, 0], [0, 0, 1]])
for y in range(h):
for x in range(w):
flip_x, flip_y, _ = np.dot([x, y, 1], flip_matrix)
fliped_image[flip_y, flip_x] = image[y, x]

return fliped_image
img = cv.imread("images/dog2.jpg")
h, w, c = img.shape
img = cv.resize(img, (w // 4, h // 4))
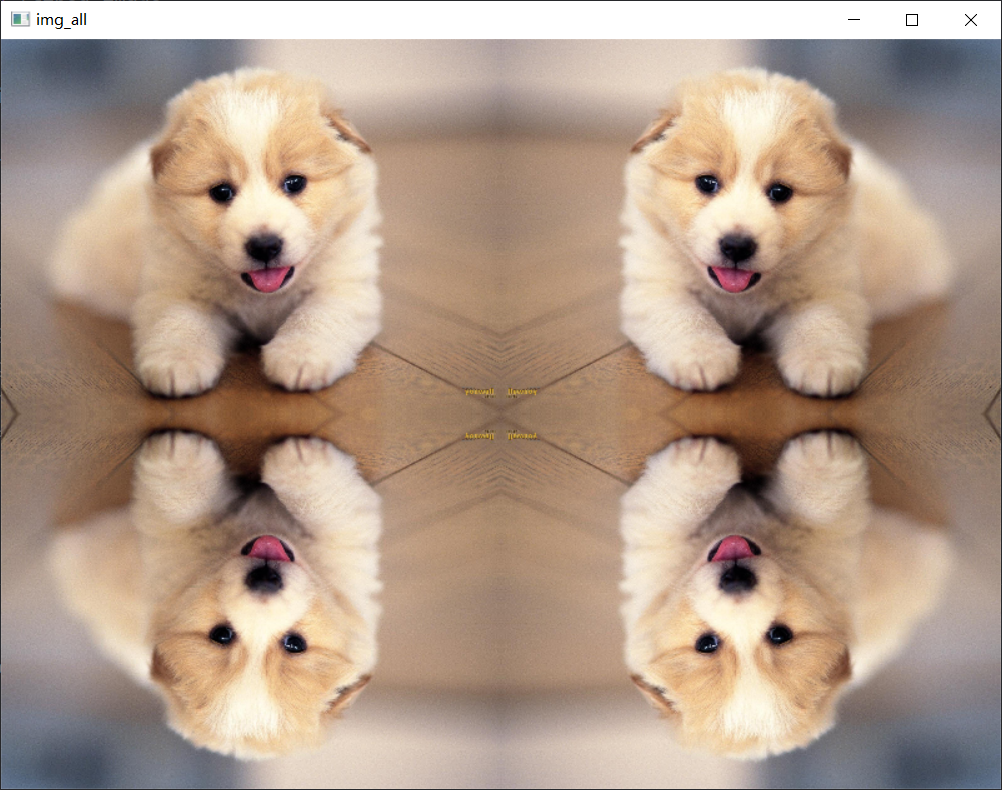
fliped_img_x = flip_image(img, "x")
fliped_img_y = flip_image(img, "y")
fliped_img_x_y = flip_image(img, "x-y")
img_up = np.hstack((img, fliped_img_x))
img_down = np.hstack((fliped_img_y, fliped_img_x_y))
img_all = np.vstack((img_up, img_down))
show_Img("img_all", img_all)

image-20230413224058277

旋转图像

图像的旋转相比平移和镜像就稍微复杂了一些

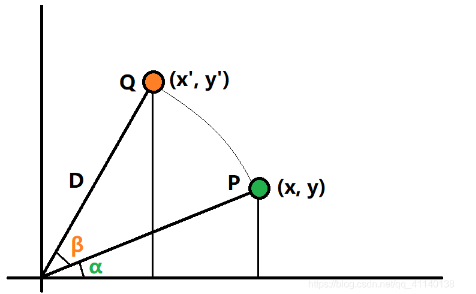
image-20230413224354192

如图可知,初始点为$(x, y)$逆时针旋转$\beta$角度后为$(x’, y’)$

数学分析:

用矩阵表示为:

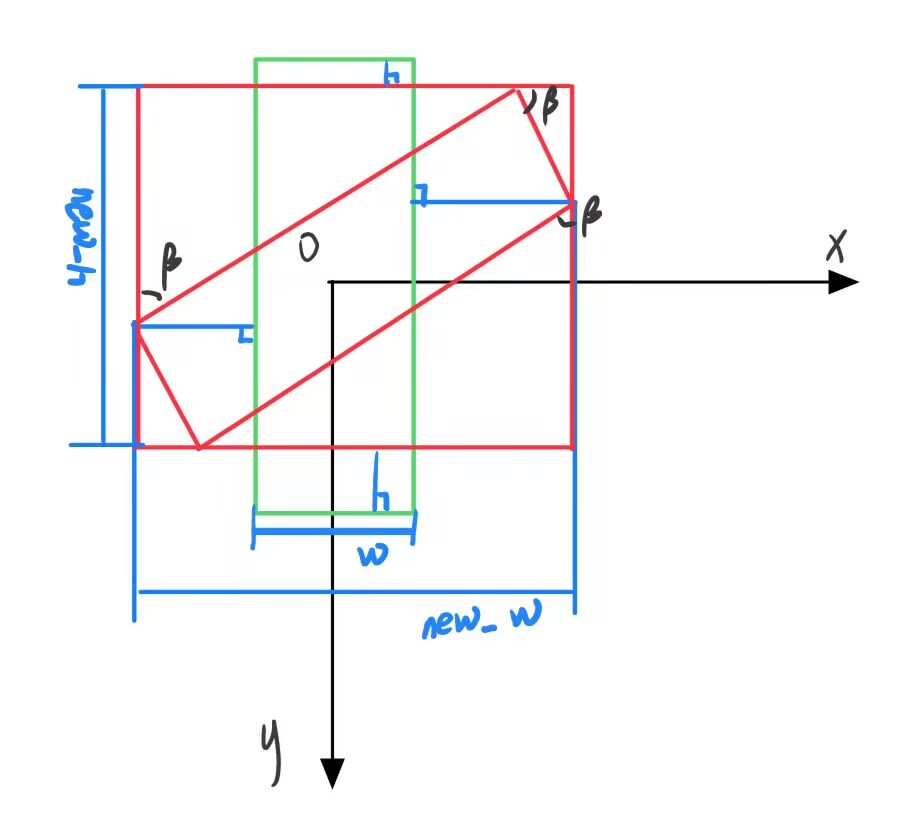
但这并不是整个图像旋转的原理,因为还要指定旋转点,这里假设图像旋转点为图像的中心,即$(w/2, h/2)$,则在旋转时需要将图像的坐标系移动到原本图像的中心上:

image-20230413231431473

由上图可知,旋转时,整个图像的大小也随之改变,新的高度与宽度为:

旋转完后的图像在需要平移到原来的位置:

总的矩阵为:

前向映射

1
2
3
4
5
6
7
8
9
10
11
12
13
14
15
16
17
18
19
20
21
22
23
24
25
26
27
28
29
30
31
32
33
34
35
36
37
38
39
40
41
42
43
44
45
46
47
48
49
50
51
52
53
54
55
56
57
58
import cv2 as cv
import numpy as np


def show_Img(name, img):
cv.imshow(name, img)
cv.waitKey(0)
cv.destroyAllWindows()


# 前向映射旋转
def front_rotate_image(image, angle):
# 将角度转换为弧度
radians = np.deg2rad(angle)

# 计算旋转矩阵
cos_theta = np.around(np.cos(radians), decimals=4)
sin_theta = np.around(np.sin(radians), decimals=4)
rotation_matrix = np.array([[cos_theta, sin_theta, 0], [-sin_theta, cos_theta, 0], [0, 0, 1]])

# 计算旋转后的图像大小
height, width = image.shape[:2]
new_width = int(np.round(width * abs(cos_theta) + height * abs(sin_theta)))
new_height = int(np.round(height * abs(cos_theta) + width * abs(sin_theta)))
print(new_width, new_height)
# 创建新图像
rotated_image = np.zeros((new_height, new_width, 3), dtype=np.uint8)
# 计算旋转中心点
center_x = width / 2
center_y = height / 2
# 将坐标系平移回原来的位置,加上自定义旋转点的偏移量
x_step = (new_width - width) * (center_x / width) + (center_x - 1)
y_step = (new_height - height) * (center_y / height) + (center_y - 1)
translation_matrix1 = np.array([[1, 0, 0], [0, 1, 0], [-center_x, -center_y, 1]])
translation_matrix2 = np.array([[1, 0, 0], [0, 1, 0], [x_step, y_step, 1]])
# 遍历每个像素并进行变换
for y in range(height):
for x in range(width):
# 将坐标系平移至中心点
translated_x, translated_y, _ = np.dot([x, y, 1], translation_matrix1)

# 计算旋转后的坐标
rotated_x, rotated_y, _ = np.dot([translated_x, translated_y, 1], rotation_matrix)

rotated_x, rotated_y, _ = np.dot([rotated_x, rotated_y, 1], translation_matrix2)
# 如果旋转后的坐标在原图像范围内,则将该像素复制到新图像中
if 0 <= rotated_x < new_width and 0 <= rotated_y < new_height:
rotated_image[int(np.round(rotated_y)), int(np.round(rotated_x))] = image[y, x]
return rotated_image


img = cv.imread("images/kunkun.jpg")
theta = 45
h, w, c = img.shape
img = cv.resize(img, (w // 2, h // 2))
img_rotated = front_rotate_image(img, theta)
show_Img("img_rotated", img_rotated)

原图:

在这里插入图片描述

结果:

image-20230413232930045

从上面看来,使用前向映射会造成许多网格状,这是因为有原图到旋转后的图,会生成小数坐标,导致丢失一部分像素,而后面会使用后向映射加线性插值的方法解决此问题。

后向映射

1
2
3
4
5
6
7
8
9
10
11
12
13
14
15
16
17
18
19
20
21
22
23
24
25
26
27
28
29
30
31
32
33
34
35
36
37
38
39
40
41
42
43
44
45
46
47
48
49
50
51
52
53
54
55
56
57
58
59
60
61
62
63
64
65
66
67
68
69
70
71
# 反向映射旋转
def back_rotate_image(image, angle):
# 将角度转换为弧度
radians = np.deg2rad(angle)

# 计算旋转矩阵
cos_theta = np.around(np.cos(radians), decimals=4)
sin_theta = np.around(np.sin(radians), decimals=4)
# /////
rotation_matrix = np.array([[-sin_theta, cos_theta, 0], [-cos_theta, -sin_theta, 0], [0, 0, 1]])
# 计算旋转后的图像大小
height, width = image.shape[:2]
print(height, width)
new_width = int(np.round(width * abs(cos_theta) + height * abs(sin_theta)))
new_height = int(np.round(height * abs(cos_theta) + width * abs(sin_theta)))
print(new_width, new_height)
# 创建新图像
rotated_image = np.zeros((new_height, new_width, 3), dtype=np.uint8)
# 计算旋转中心点
center_x = width / 2
center_y = height / 2
translation_matrix1 = np.array([[1, 0, 0], [0, 1, 0], [-center_x, -center_y, 1]])
# 将坐标系平移回原来的位置,加上自定义旋转点的偏移量
x_step = (new_width - width) * (center_x / width) + center_x - 1
y_step = (new_height - height) * (center_y / height) + center_y - 1

# x_step = new_width / 2
# y_step = new_height / 2
# /////
translation_matrix2 = np.array([[1, 0, 0], [0, 1, 0], [y_step, x_step, 1]])
# 遍历每个像素并进行变换
matrix = np.dot(translation_matrix1, rotation_matrix)
matrix = np.around(np.dot(matrix, translation_matrix2), decimals=4)
matrix_inv = np.around(np.linalg.inv(matrix), decimals=4)
print("---------------------")
print(matrix_inv)
print(matrix)
x_list = []
y_list = []
for y in range(new_height):
for x in range(new_width):
# 将坐标系平移至中心点
translated_x, translated_y, _ = np.dot([y, x, 1], matrix_inv)
# x_list.append(translated_x)
# y_list.append(translated_y)
rotated_image[y, x] = bilinear_interpolation(image, translated_y, translated_x)

return rotated_image


def bilinear_interpolation(image, y, x):
height, width = image.shape[:2]
if 0 <= int(x) < width - 1 and 0 <= int(y) < height - 1:
# rotated_image[y, x] = image[int(translated_y), int(translated_x)]
left = int(np.floor(y))
right = int(np.ceil(y))
bottom = int(np.floor(x))
top = int(np.ceil(x))
# print(left, right, bottom, top, sep=" ")
a = y - left
b = x - bottom
# print(image[left, bottom])
p1 = image[left, bottom]
p2 = image[right, bottom]
p3 = image[left, top]
p4 = image[right, top]
color = (1 - a) * (1 - b) * p1 + a * (1 - b) * p2 + (1 - a) * b * p3 + a * b * p4

return color
else:
return 0
上一篇:
Ubuntu添加桌面图标快捷方式
下一篇:
STM32HAL库驱动MPU6050
本文目录
本文目录