Ultra_Fusion算法Docker部署
发表于:2026-07-12 | 分类: SLAM

论文:https://arxiv.org/abs/2501.11515

Github:https://github.com/sjtuyinjie/Ultra-Fusion.git

windows安装WSL2

手动安装

因为如果直接安装wsl --install,会下载不到你自己想要的Ubuntu 版本

1
wsl --update

然后设置WSL默认版本

1
2
# 将 WSL 默认版本设置为 WSL 2
wsl --set-default-version 2

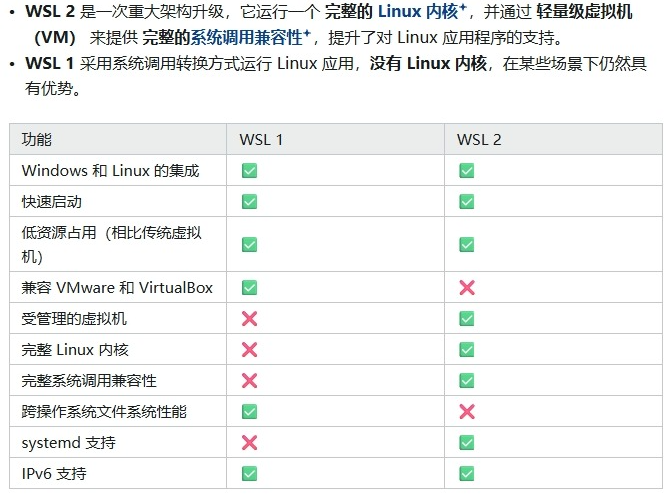
wsl1与wsl2区别:

img

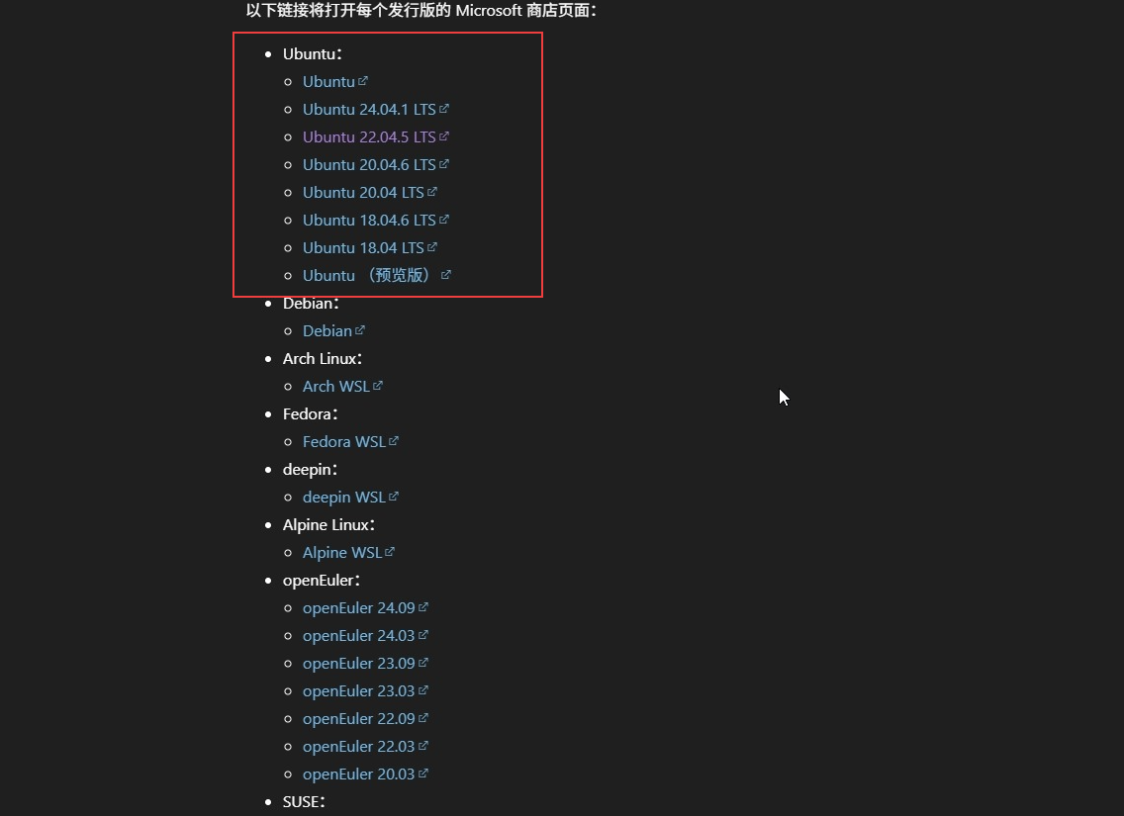
官网下载Ubuntu版本

https://learn.microsoft.com/zh-cn/windows/wsl/install-manual#step-6---install-your-linux-distribution-of-choice

image-20260712214908634

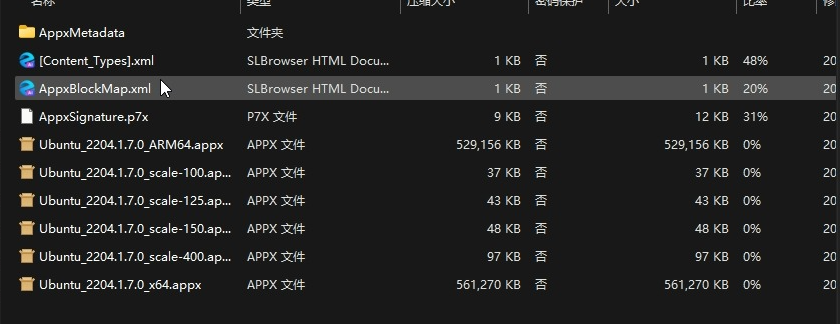
下载下来是一个后缀为AppxBundle文件,修改后缀为zip,然后解压

image-20260712214931765

找到后缀为appx最大文件并且适合自己的windows版本,我的为x64

修改appx后缀为zip,然后解压,移动到想要自己安装的路径,例如移动到D盘
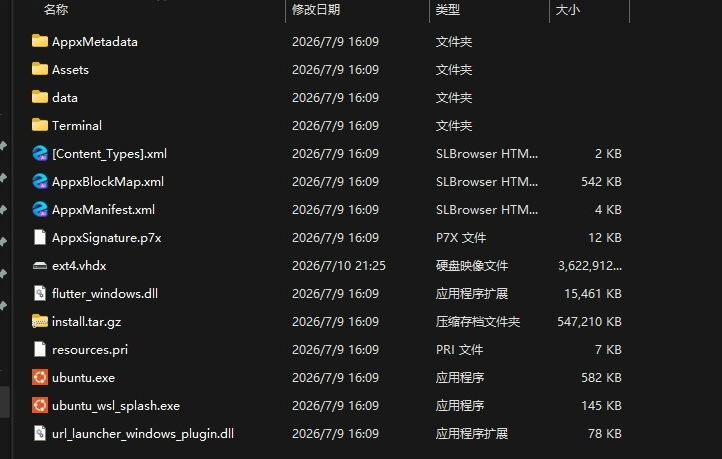
image-20260712214940190

然后双击ubuntu.exe文件即可,初次打开会让你设置用户名和密码,然后在文件夹里生成一个ext4.vhdx文件
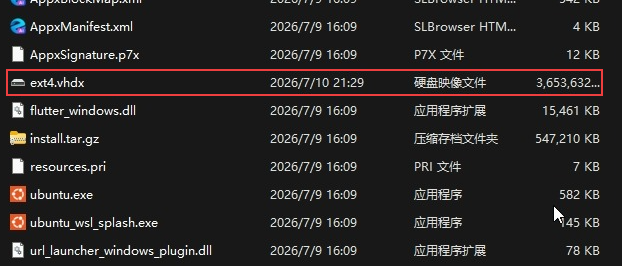
image-20260712215316923

参考连接:https://blog.csdn.net/weixin_48076899/article/details/135214749

打开wsl

按win键输入wsl或者ubuntu即可打开

wsl相关命令如下

命令 功能说明
wsl 直接启动默认 WSL 发行版,进入 Linux 交互终端
wsl --list 查看已安装的所有 WSL 发行版
wsl --list --verbose 查看已安装发行版的详细信息(版本、运行状态、默认标识)
wsl --install 一键安装 WSL2 + 默认 Ubuntu 发行版
wsl --install -d <发行版名> 指定发行版安装 WSL
wsl -d <发行版名> 启动指定名称的 WSL 发行版
wsl --set-default <发行版名> 设置指定发行版为默认启动系统
wsl --shutdown 强制关闭所有正在运行的 WSL 虚拟机
wsl -t <发行版名> 单独终止指定发行版的运行进程
wsl --set-version <发行版名> 2 将指定发行版切换为 WSL2 版本(推荐)
wsl --get-default-version 查看新建发行版默认使用的 WSL 版本
wsl --set-default-version 2 设置新建发行版默认使用 WSL2
wsl --export <发行版名> <保存路径> 导出发行版镜像备份为 tar 文件
wsl --unregister <发行版名> 注销指定发行版(删除所有数据,不可恢复)
wsl --uninstall 卸载 WSL 组件与虚拟机平台
wsl --help 查看 WSL 命令的全部官方参数说明

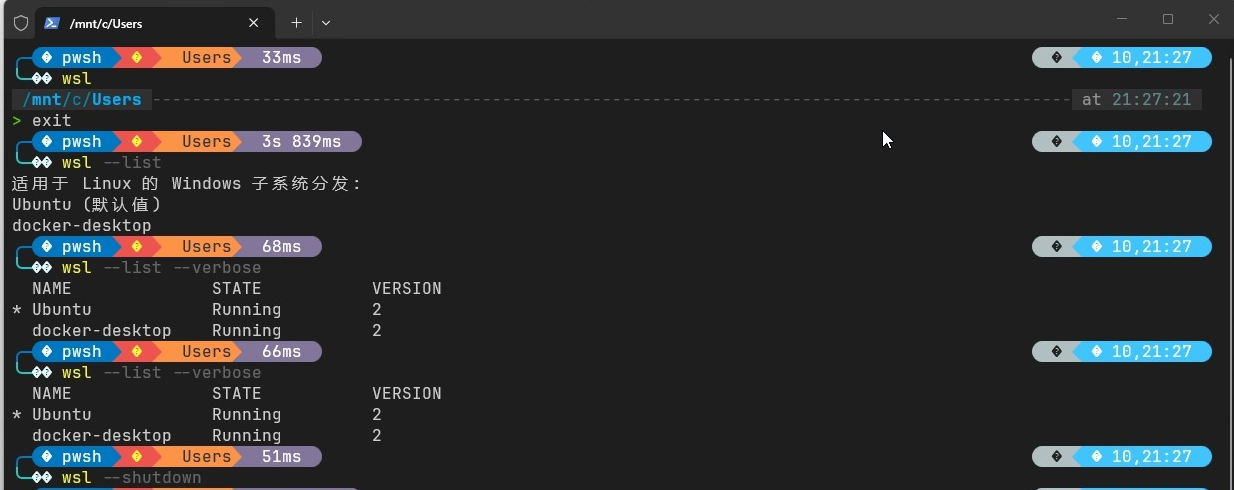
wsl里推出到powershell :exit

image-20260712215331838

挂载目录

默认挂载目录

Windows 盘符 WSL 内默认挂载路径 说明
C: **/mnt/c/** 系统盘,可读写
D: **/mnt/d/** 数据盘
E: / F: / U 盘 **/mnt/e/**``**/mnt/f/**``**/mnt/u/** 所有固定 / 移动磁盘自动挂载

自定义挂载

1
2
mkdir /home/ychooo/datasets
sudo mount -t drvfs E:/Datasets /home/ychooo/datasets

这就相当于把wsl2中的/home/ychooo/datasets文件夹映射到windows的E:/Datasets文件夹

这里推荐使用mkdir,因为后续docker目录挂载如果使用sudo mkdir创建的目录,后续在docker中映射不到

使用:ro 代表只读挂载,不影响读取查看文件,但有 2 个坑:

  1. 容器内无法新建 / 修改文件,但原有文件一定能 ls 看到;
  2. 如果宿主机目录权限是 root,WSL 普通用户可读,但容器内 root 权限不兼容会看不见。

开机自动挂载

在wsl中执行

1
2
3
4
5
sudo nano /etc/fstab
#写入
E:\Datasets /home/ychooo/datasets drvfs defaults 0 0
#保存运行
sudo mount -a

如果重复挂载可以参考下列命令

1
2
3
4
5
6
7
8
# 1. 查看重复挂载
mount | grep drvfs
# 2. 卸载多余挂载点
sudo umount /mnt/datasets
# 3. 删除fstab多余配置
sudo nano /etc/fstab
# 4. 刷新挂载
sudo mount -a

参考链接:https://www.cnblogs.com/duzw/p/16594104.html

docker连接wsl2

下载docker desktop
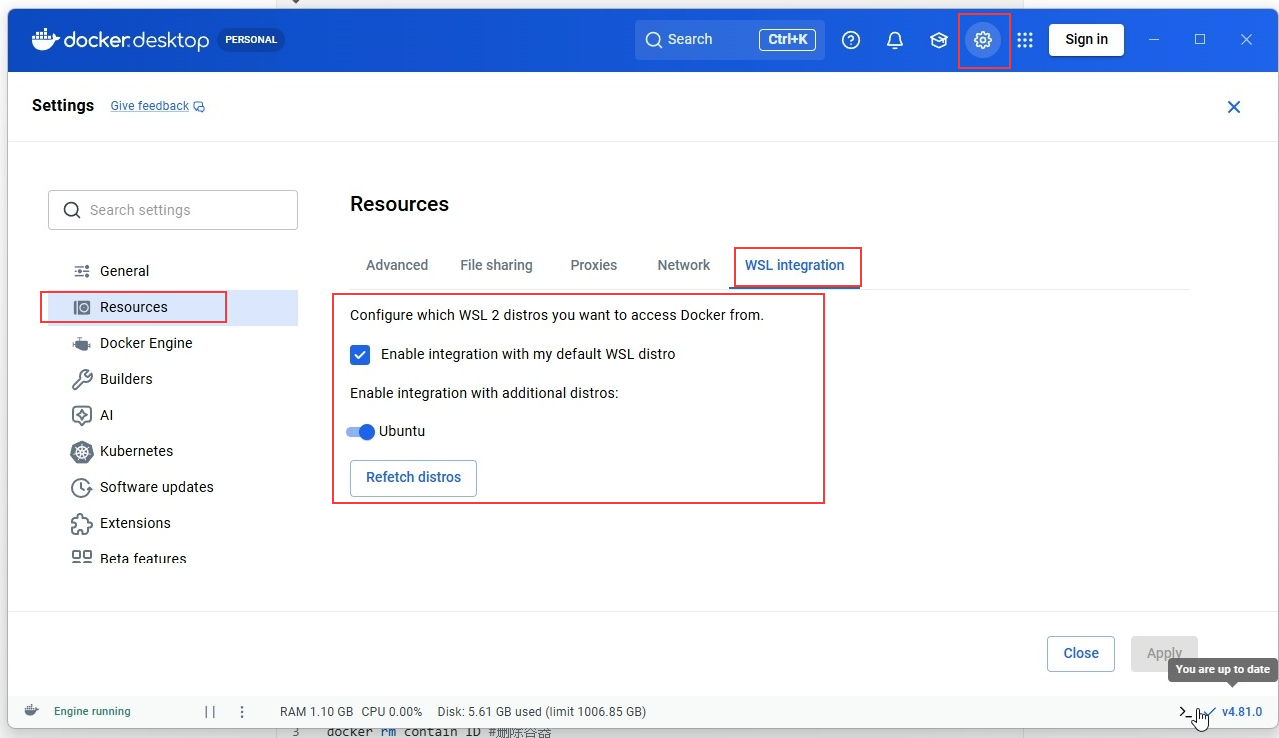
image-20260712215338784

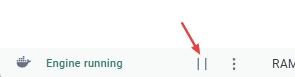
连接时一定要启动这个位置

img

否则会报错

1
failed to connect to the docker API at unix:///var/run/docker.sock; check if the path is correct and if the daemon is running: dial unix /var/run/docker.sock: connect: no such file or directory

在powershell输入命令

1
2
3
4
╰─wsl --list --verbose
NAME STATE VERSION
* Ubuntu Running 2
docker-desktop Running 2

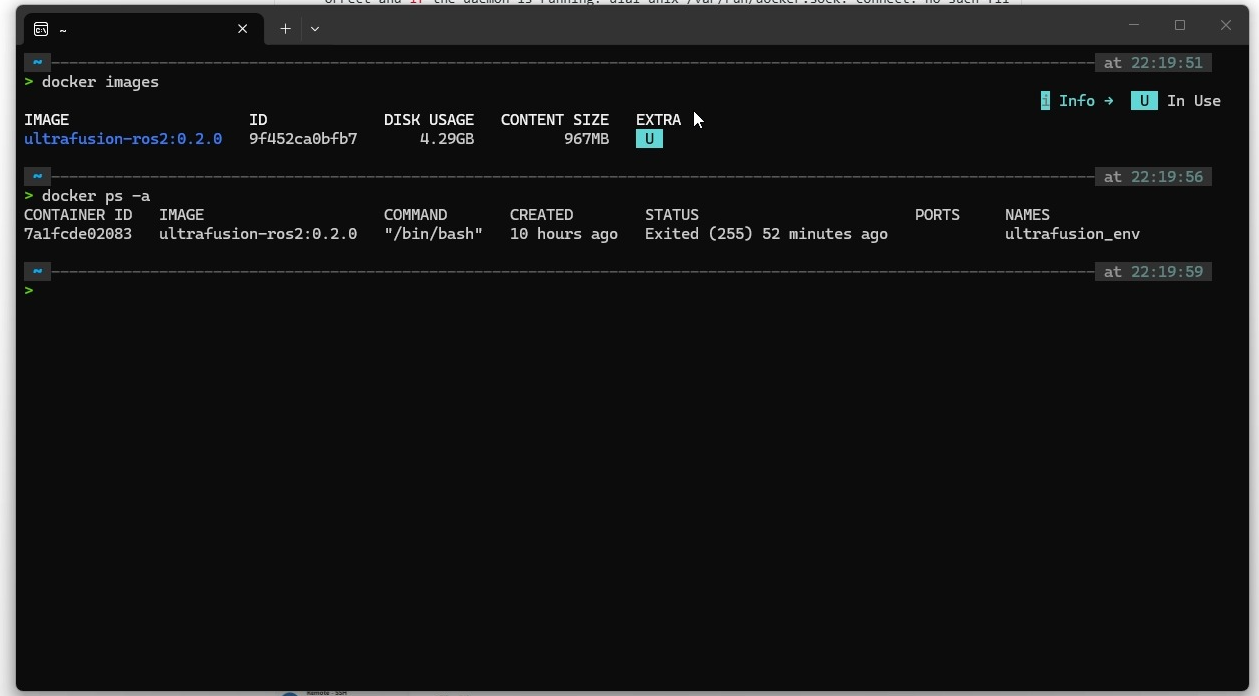
可查看运行,这样在wsl中可以检测到docker命令

image-20260712215346351

相关docker命令如下

1
2
3
4
5
docker exec -it 容器ID bash
docker ps -a #列出所有容器
docker stop contain_ID #停止容器
docker rm contain_ID #删除容器
docker rmi images_ID #删除镜像

vscode连接wsl2

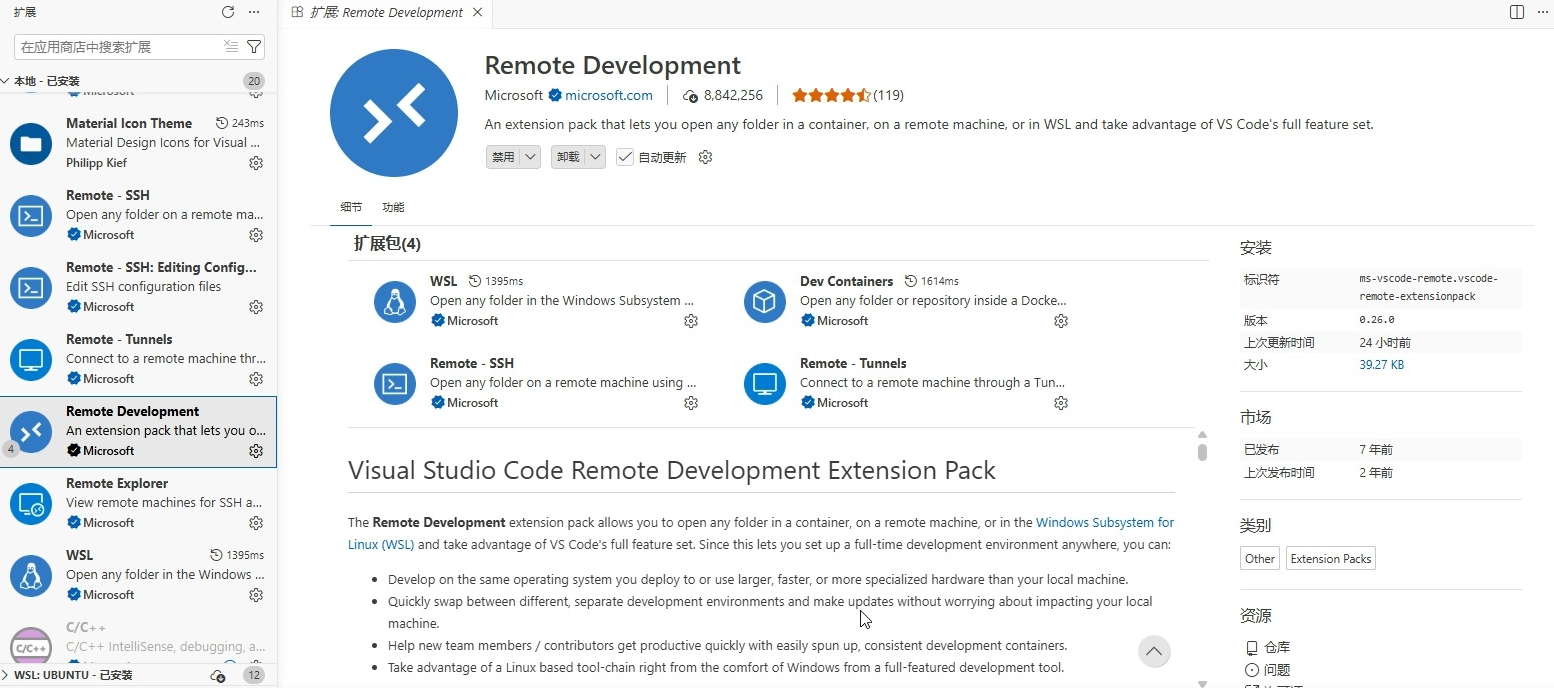
安装完成后先下载一些插件,如下相关远程的插件

image-20260712215357241

安装完成后点左下角有一个 打开远程窗口->使用发行版连接到wsl->选择Ubunt版本,连接后如下
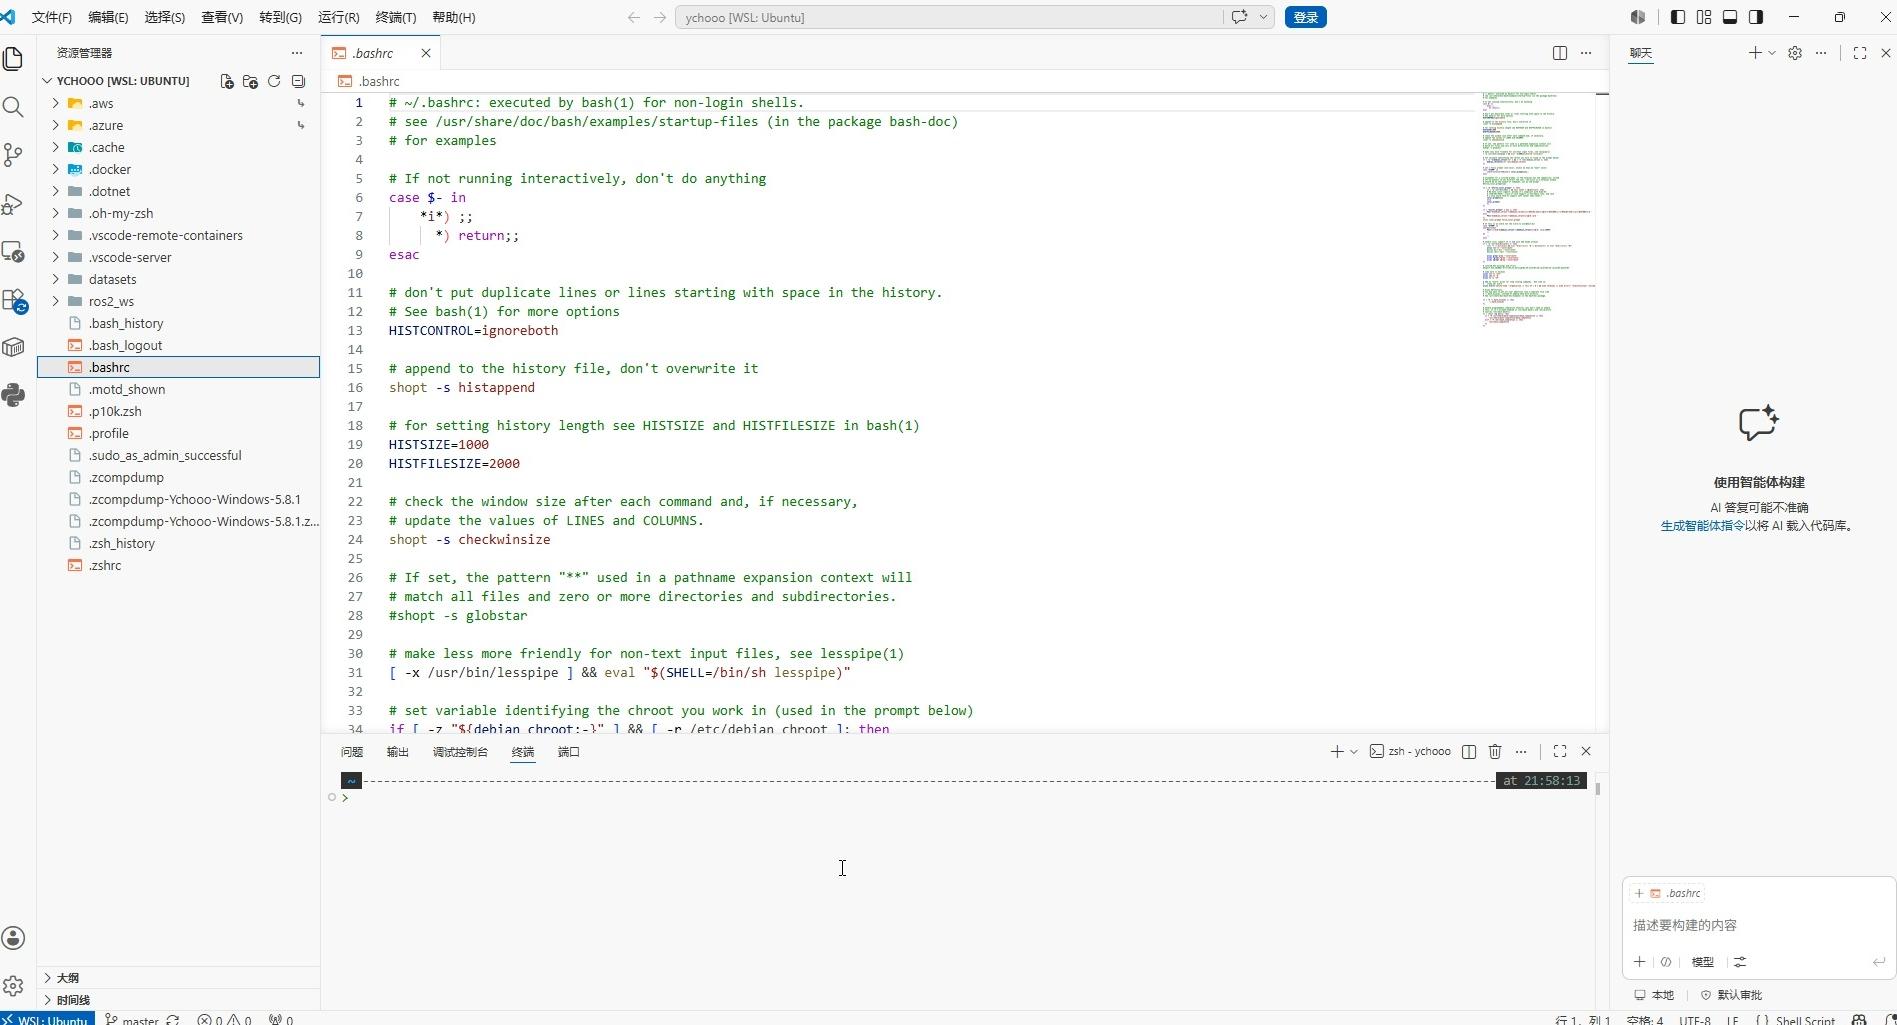
image-20260712215403164

docker部署算法

安装Ultra-Fusion

1
2
3
4
5
6
7
8
9
10
git clone https://github.com/sjtuyinjie/Ultra-Fusion.git
cd Ultra-Fusion
# 拉取镜像
docker pull maotiandocker/ultrafusion-ros2:0.2.0
# 拉阿里云镜像
docker pull registry.cn-hangzhou.aliyuncs.com/bit_robot_image/ultrafusion-ros2:0.2.0
# 简化镜像名
docker tag registry.cn-hangzhou.aliyuncs.com/bit_robot_image/ultrafusion-ros2:0.2.0 ultrafusion-ros2:0.2.0
#(可选)可删除长名字,不会删除镜像
docker rmi registry.cn-hangzhou.aliyuncs.com/bit_robot_image/ultrafusion-ros2:0.2.0

启动容器rosbag2 ├─ /livox/imu sensor_msgs/msg/Imu ───────────────┐ └─ /livox/lidar livox_ros_driver2/msg/CustomMsg │ ↓ 转换节点 │ /livox/lidar_points PointCloud2 ───────┤ ↓ Ultra-Fusion LIO

1
2
3
4
5
6
7
8
9
10
11
12
13
14
15
xhost +local:docker
# non-network local connections being added to access control list
docker run -dit --net=host --ipc=host \
--name ultrafusion_env \
-e DISPLAY="${DISPLAY}" \
-e QT_X11_NO_MITSHM=1 \
-v /tmp/.X11-unix:/tmp/.X11-unix:rw \
-v /media:/media:ro \
-v "$(pwd)":/workspace \
-v /home/ychooo/datasets:/root/datasets:ro \
ultrafusion-ros2:0.2.0
#查看容器ID
docker ps -a
#进入容器(bash\zsh)
docker exec -it contain_ID bash
分类 参数 / 选项 核心作用 关键说明
基础运行 docker run -dit 后台启动容器并保留交互能力 --name自定义容器名-d后台常驻不阻塞终端;-i保持标准输入打开;-t 分配伪终端,支持后续exec进入交互
--rm 容器停止后自动删除容器,不会残留无用容器,清理更省心
网络与进程通信 --net=host 容器共享宿主机网络命名空间 不做网络隔离,直接复用宿主机网卡、IP、端口,解决 ROS2/DDS 设备发现、端口转发、网络延迟问题
网络与进程通信 --ipc=host 容器共享宿主机进程间通信命名空间 共享内存、信号量互通,解决 RViz/Gazebo 共享内存渲染崩溃、ROS2 大数据传输卡顿问题
GUI 图形环境 -e DISPLAY="${DISPLAY}" 传递图形显示地址 告诉容器内 GUI 程序(RViz/Gazebo/Qt)渲染到宿主机 X11 显示服务器,否则会报无法连接显示的错误
GUI 图形环境 -e QT_X11_NO_MITSHM=1 关闭 Qt 共享内存扩展 经典排错参数,解决容器内 RViz 白屏、Gazebo 闪退、Qt 程序 X11 报错问题
数据卷挂载 -v /tmp/.X11-unix:/tmp/.X11-unix:rw 挂载 X11 图形套接字 GUI 必备参数,容器通过该套接字和宿主机显卡通信,无此挂载无法弹出图形窗口,rw为读写权限
数据卷挂载 -v /media:/media:ro 挂载宿主机外接存储目录 只读(ro)映射 U 盘、移动硬盘等外接设备,容器内可直接读取数据集、标定文件
数据卷挂载 -v "$(pwd)":/workspace 挂载当前终端目录到容器 宿主机当前工作目录映射到器/workspace,默认读写,本地代码修改实时同步到容器,无需重新构建镜像
数据卷挂载 -v /home/ychooo/ros2_ws/datasets:/root/datasets:ro 挂载宿主机数据集目录 只读映射本地数据集文件夹到容器/root/datasets,保护原始点云 / 图像数据不被误修改
镜像标识 ultrafusion-ros2:0.2.0 指定启动的容器镜像 基于 Ultra-Fusion 多传感器融合 ROS2 环境镜像,0.2.0 为指定的镜像版本标签

这里以自己录制的数据集为例

1
2
3
4
5
6
7
8
9
10
11
12
13
14
15
[INFO] [1783862094.897458058] [rosbag2_storage]: Opened database 'rosbag2_2026_07_03-16_05_12/rosbag2_2026_07_03-16_05_12_0.db3' for READ_ON│> [ DataSync_Interpolation ] average time usage: 0.0013789 ms , called times: 1853
LY. │> [ FeatureCloud_Publish ] average time usage: 0.256092 ms , called times: 1833
│> [ ImuWheel_Buffer_ESKF ] average time usage: 0.00709597 ms , called times: 1853
Files: rosbag2_2026_07_03-16_05_12/rosbag2_2026_07_03-16_05_12_0.db3 │> [ MAPInitialization ] average time usage: 8.25075 ms , called times: 1
Bag size: 737.9 MiB │> [ OnlyLidarMatching ] average time usage: 44.02 ms , called times: 1833
Storage id: sqlite3 │> [ OnlyLidarMatching_CeresSolve ] average time usage: 3.43973 ms , called times: 13225
Duration: 191.383279148s │> [ OnlyLidarMatching_Init ] average time usage: 21.7657 ms , called times: 20
Start: Jul 3 2026 08:05:12.164392407 (1783065912.164392407) │> [ Optimization_Total ] average time usage: 61.8928 ms , called times: 1853
End: Jul 3 2026 08:08:23.547671555 (1783066103.547671555) │> [ PostProcessPublish ] average time usage: 1.40701 ms , called times: 1853
Messages: 39753 │> [ Preinit_Prediction ] average time usage: 0.246912 ms , called times: 20
Topic information: Topic: /rosout | Type: rcl_interfaces/msg/Log | Count: 15 | Serialization Format: cdr │> [ Tracking_Prediction ] average time usage: 1.89409 ms , called times: 1833
Topic: /events/write_split | Type: rosbag2_interfaces/msg/WriteSplitEvent | Count: 0 | Serialization Format: cdr │> [ UFEstimateLidarPose ] average time usage: 17.941 ms , called times: 1833
Topic: /livox/imu | Type: sensor_msgs/msg/Imu | Count: 37846 | Serialization Format: cdr │> [ UFEstimate_CeresSolve ] average time usage: 13.9556 ms , called times: 1833
Topic: /livox/lidar | Type: livox_ros_driver2/msg/CustomMsg | Count: 1892 | Serialization Format: cdr │> [ ZUPT_Check ] average time usage: 0.00310374 ms , called times: 1853
Topic: /parameter_events | Type: rcl_interfaces/msg/ParameterEvent | Count: 0 | Serialization Format: cdr

安装ROS2相关依赖

1
2
3
4
5
6
7
8
apt install \
ros-humble-ros-base \
ros-humble-ament-cmake \
ros-humble-ament-cmake-auto \
python3-colcon-common-extensions \
ros-humble-rosidl-default-generators \
ros-humble-rosidl-default-runtime \
ros-humble-rosidl-typesupport-cpp

安装Livox驱动

参考https://ychooo.netlify.app/2026/05/16/vmware%E5%9C%A8ubuntu22-04%E9%A9%B1%E5%8A%A8livoxmid360s/#%E9%9B%B7%E8%BE%BE%E9%A9%B1%E5%8A%A8%E9%85%8D%E7%BD%AE,这篇文章

数据及转换

我的数据bag 不能直接使用当前官方 Ultra-Fusion ROS2 v0.2.1 配置运行,原因是:

1
2
/livox/lidar
类型:livox_ros_driver2/msg/CustomMsg

而 Ultra-Fusion ROS2 版本实际接收的是:

1
sensor_msgs/msg/PointCloud2

官方的 M3DGR ROS2 流程也会先把 Livox CustomMsg 转换为 PointCloud2,再交给 uf_node

正确链路为:

1
2
3
4
5
6
7
rosbag2
├─ /livox/imu sensor_msgs/msg/Imu ───────────────┐
└─ /livox/lidar livox_ros_driver2/msg/CustomMsg │
↓ 转换节点 │
/livox/lidar_points PointCloud2 ───────┤

Ultra-Fusion LIO

修改/opt/ultrafusion/config/m3dgr/uf_m3dgr_ros2_lio.yaml的雷达和IMU话题

创建 CustomMsg → PointCloud2 转换节点

1
2
3
4
5
6
7
8
9
10
11
12
13
14
15
16
17
18
19
20
21
22
23
24
25
26
27
28
29
30
31
32
33
34
35
36
37
38
39
40
41
42
43
44
45
46
47
48
49
50
51
52
53
54
55
56
57
58
59
60
61
62
63
64
65
66
67
68
69
70
71
72
73
74
75
76
77
78
79
80
81
82
83
84
85
86
87
88
89
90
91
92
93
94
95
96
97
98
99
100
101
102
103
104
105
106
107
108
109
110
111
112
113
114
115
116
117
118
119
120
121
122
123
124
125
126
127
128
129
130
131
132
133
134
135
136
137
138
139
140
141
142
143
144
145
146
147
148
149
150
touch Ultra_Fusion/scripts/livox_custom_to_pointcloud2.py  
chmod +x Ultra_Fusion/scripts/livox_custom_to_pointcloud2.py
#!/usr/bin/env python3

import rclpy
from rclpy.node import Node
from rclpy.qos import (
QoSProfile,
ReliabilityPolicy,
DurabilityPolicy,
HistoryPolicy,
)

from sensor_msgs.msg import PointField
from sensor_msgs_py import point_cloud2
from livox_ros_driver2.msg import CustomMsg


class LivoxCustomToPointCloud2(Node):
"""Convert Livox CustomMsg into the PointCloud2 layout expected by Ultra-Fusion."""

def __init__(self) -> None:
super().__init__("livox_custom_to_pointcloud2")

input_qos = QoSProfile(
history=HistoryPolicy.KEEP_LAST,
depth=20,
reliability=ReliabilityPolicy.BEST_EFFORT,
durability=DurabilityPolicy.VOLATILE,
)

output_qos = QoSProfile(
history=HistoryPolicy.KEEP_LAST,
depth=10,
reliability=ReliabilityPolicy.RELIABLE,
durability=DurabilityPolicy.VOLATILE,
)

self.fields = [
PointField(
name="x",
offset=0,
datatype=PointField.FLOAT32,
count=1,
),
PointField(
name="y",
offset=4,
datatype=PointField.FLOAT32,
count=1,
),
PointField(
name="z",
offset=8,
datatype=PointField.FLOAT32,
count=1,
),
PointField(
name="intensity",
offset=12,
datatype=PointField.FLOAT32,
count=1,
),
PointField(
name="timestamp",
offset=16,
datatype=PointField.FLOAT64,
count=1,
),
PointField(
name="tag",
offset=24,
datatype=PointField.UINT8,
count=1,
),
PointField(
name="line",
offset=25,
datatype=PointField.UINT8,
count=1,
),
]

self.publisher = self.create_publisher(
msg_type=point_cloud2.PointCloud2,
topic="/livox/lidar_points",
qos_profile=output_qos,
)

self.subscription = self.create_subscription(
msg_type=CustomMsg,
topic="/livox/lidar",
callback=self.callback,
qos_profile=input_qos,
)

self.frame_count = 0
self.get_logger().info(
"Converting /livox/lidar CustomMsg -> "
"/livox/lidar_points PointCloud2"
)

def callback(self, msg: CustomMsg) -> None:
# Ultra-Fusion's Livox PointCloud2 path expects an absolute
# per-point timestamp expressed in nanoseconds.
points = [
(
float(point.x),
float(point.y),
float(point.z),
float(point.reflectivity),
float(msg.timebase + point.offset_time),
int(point.tag),
int(point.line),
)
for point in msg.points
]

cloud = point_cloud2.create_cloud(
header=msg.header,
fields=self.fields,
points=points,
)

cloud.is_dense = True
self.publisher.publish(cloud)

self.frame_count += 1
if self.frame_count % 100 == 0:
self.get_logger().info(
f"Converted {self.frame_count} frames, "
f"current points: {len(points)}"
)


def main() -> None:
rclpy.init()
node = LivoxCustomToPointCloud2()

try:
rclpy.spin(node)
except KeyboardInterrupt:
pass
finally:
node.destroy_node()
rclpy.shutdown()


if __name__ == "__main__":
main()

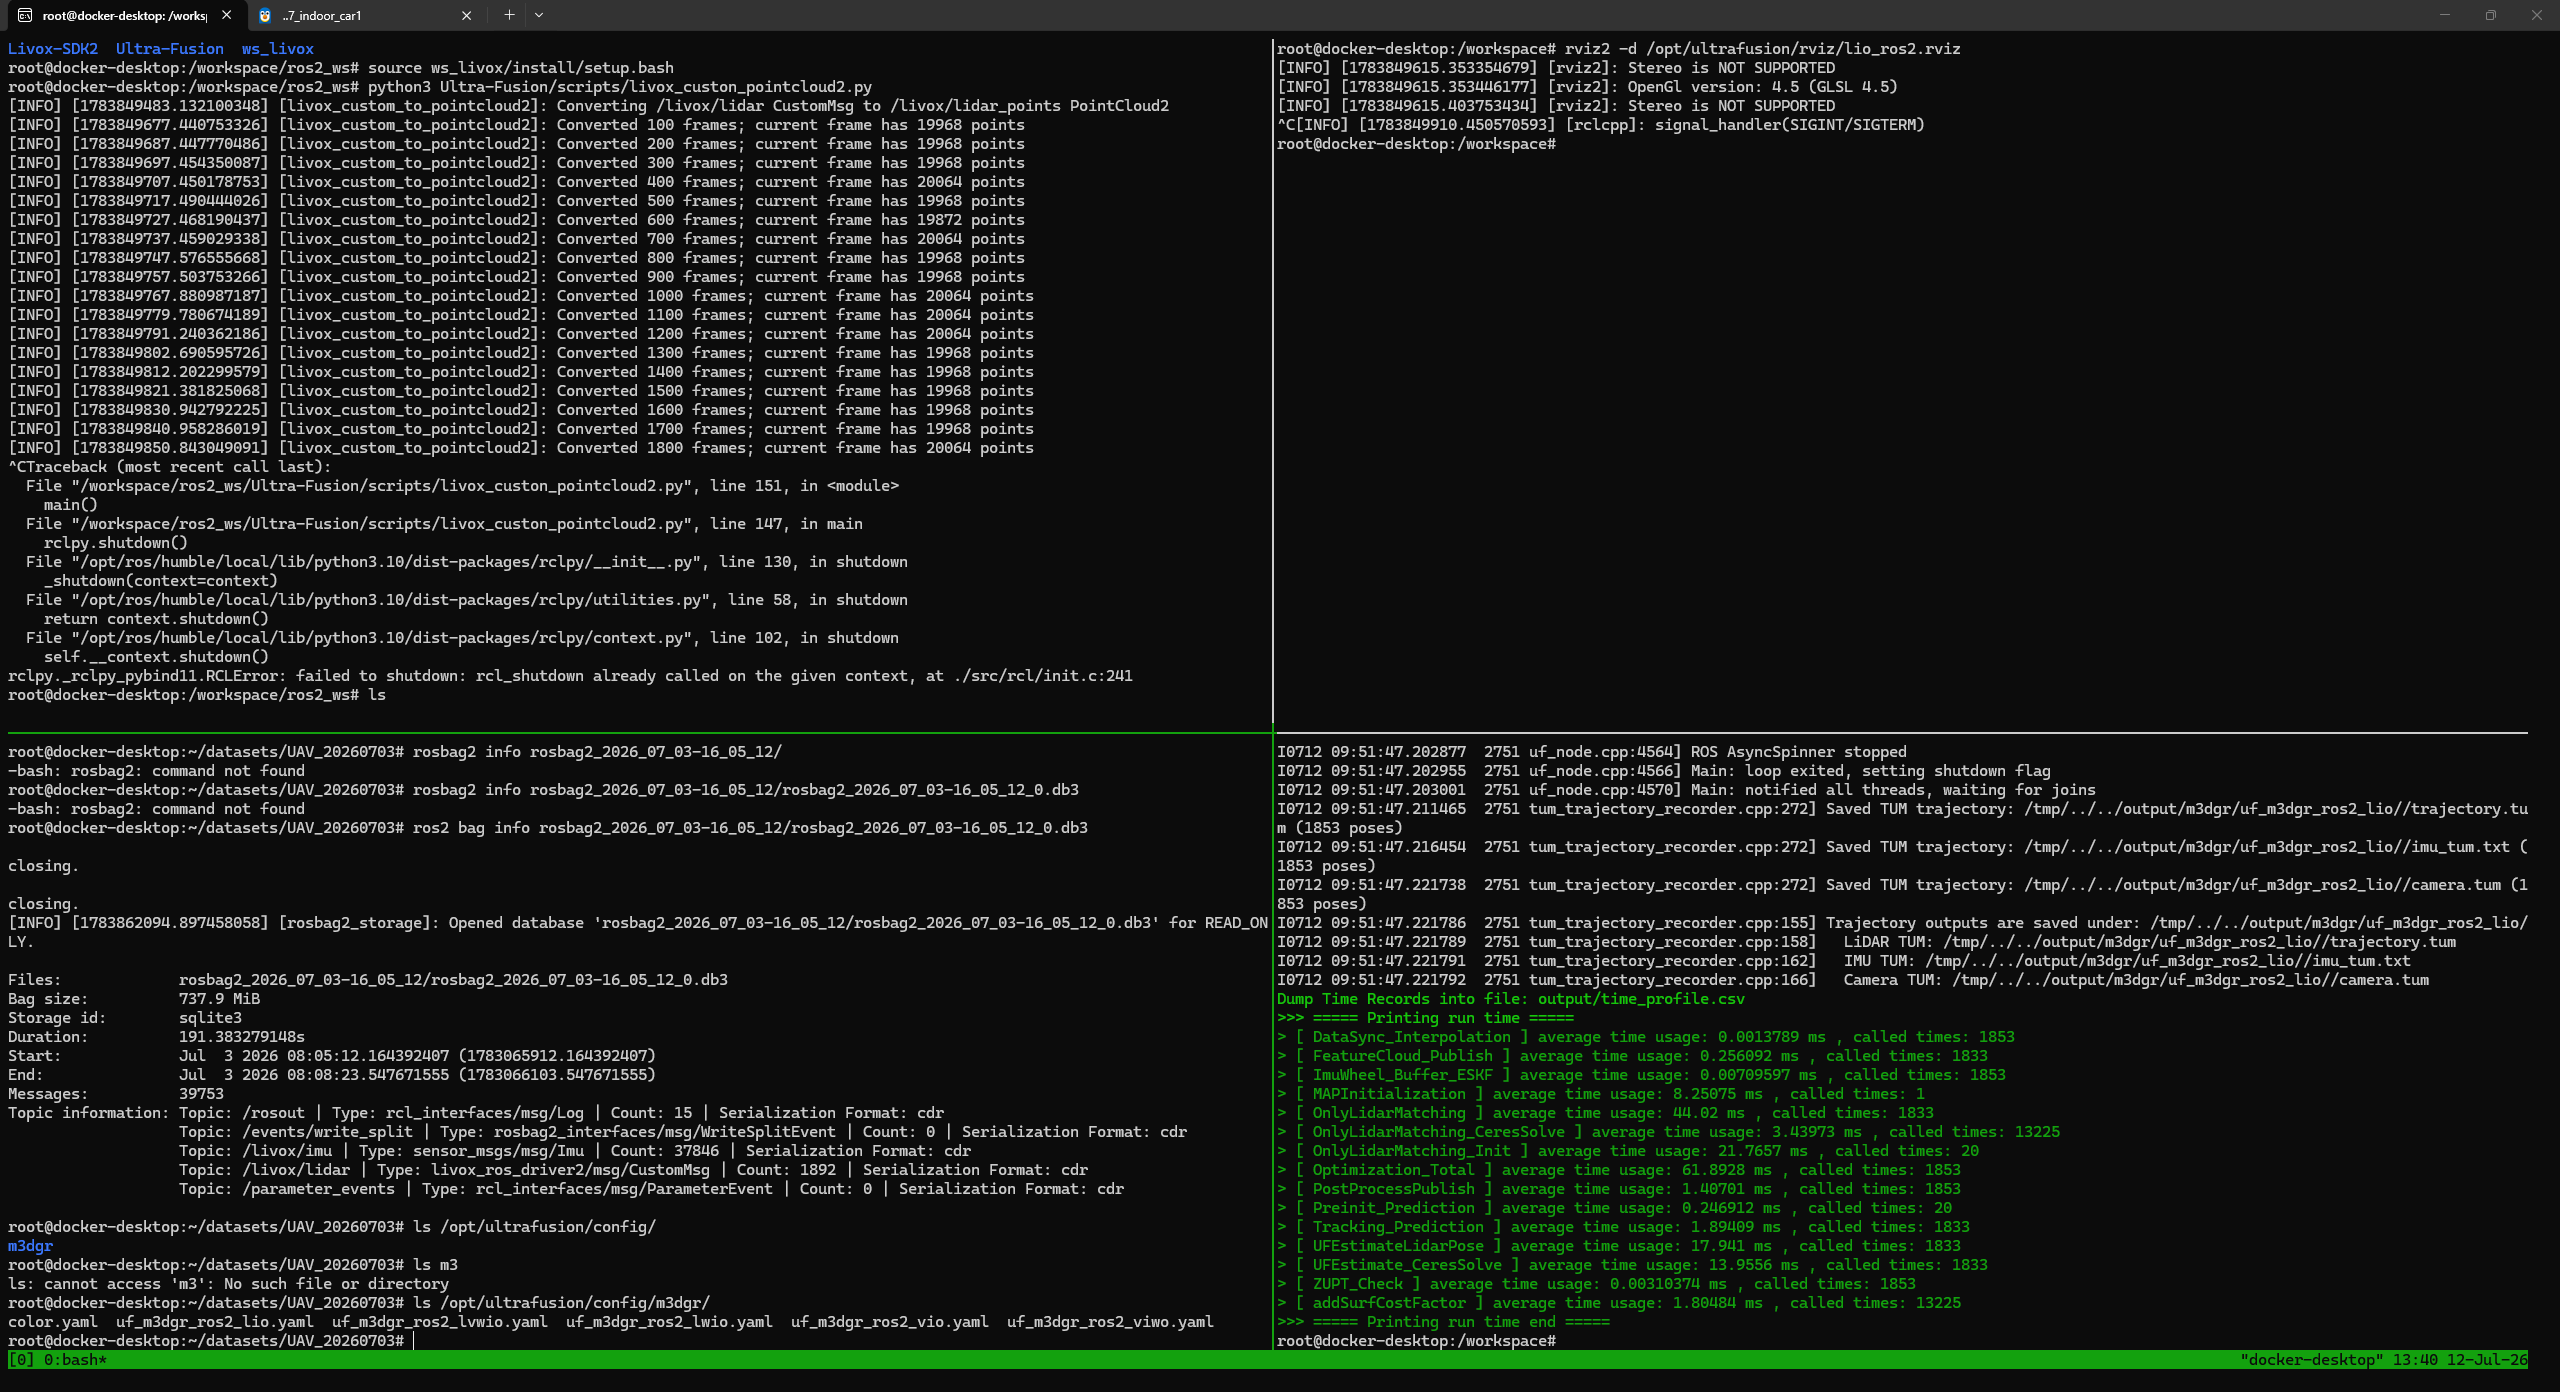
运行算法

终端1:启动消息转换节点

1
2
3
4
source /opt/ros/humble/setup.bash
source ~/ws_livox/install/setup.bash

python3 ~/uf_tools/livox_custom_to_pointcloud2.py

正常输出:

1
2
Converting /livox/lidar CustomMsg ->
/livox/lidar_points PointCloud2

终端2:启动 Ultra-Fusion

1
2
3
source /opt/ros/humble/setup.bash

which uf_node

应得到:

1
/usr/bin/uf_node

然后执行:

1
2
3
mkdir -p ~/ultrafusion_output

uf_node /你的绝对路径/uf_m3dgr_ros2_lio.yaml

例如:

1
uf_node ~/Ultra-Fusion/config/m3dgr/uf_m3dgr_ros2_lio.yaml

官方 ROS2 版本使用的就是:

1
uf_node 配置文件.yaml

这种启动方式,不需要 ros2 launch

终端3:启动 RViz2

1
2
3
source /opt/ros/humble/setup.bash

rviz2 -d /opt/ultrafusion/rviz/lio_ros2.rviz

终端4:最后播放 bag

先进入 bag 所在目录,确认其结构:

1
ls /你的bag路径/rosbag2_2026_07_03-16_05_12

通常应包含:

1
2
metadata.yaml
rosbag2_2026_07_03-16_05_12_0.db3

播放目录,而不是只写文件名:

1
2
3
4
source /opt/ros/humble/setup.bash
source ~/ws_livox/install/setup.bash

ros2 bag play /你的bag路径/rosbag2_2026_07_03-16_05_12 --clock

Rosbag2 可以播放包含 metadata.yaml 和数据库文件的 bag 目录。

第一次测试不要加速,保持一倍速。
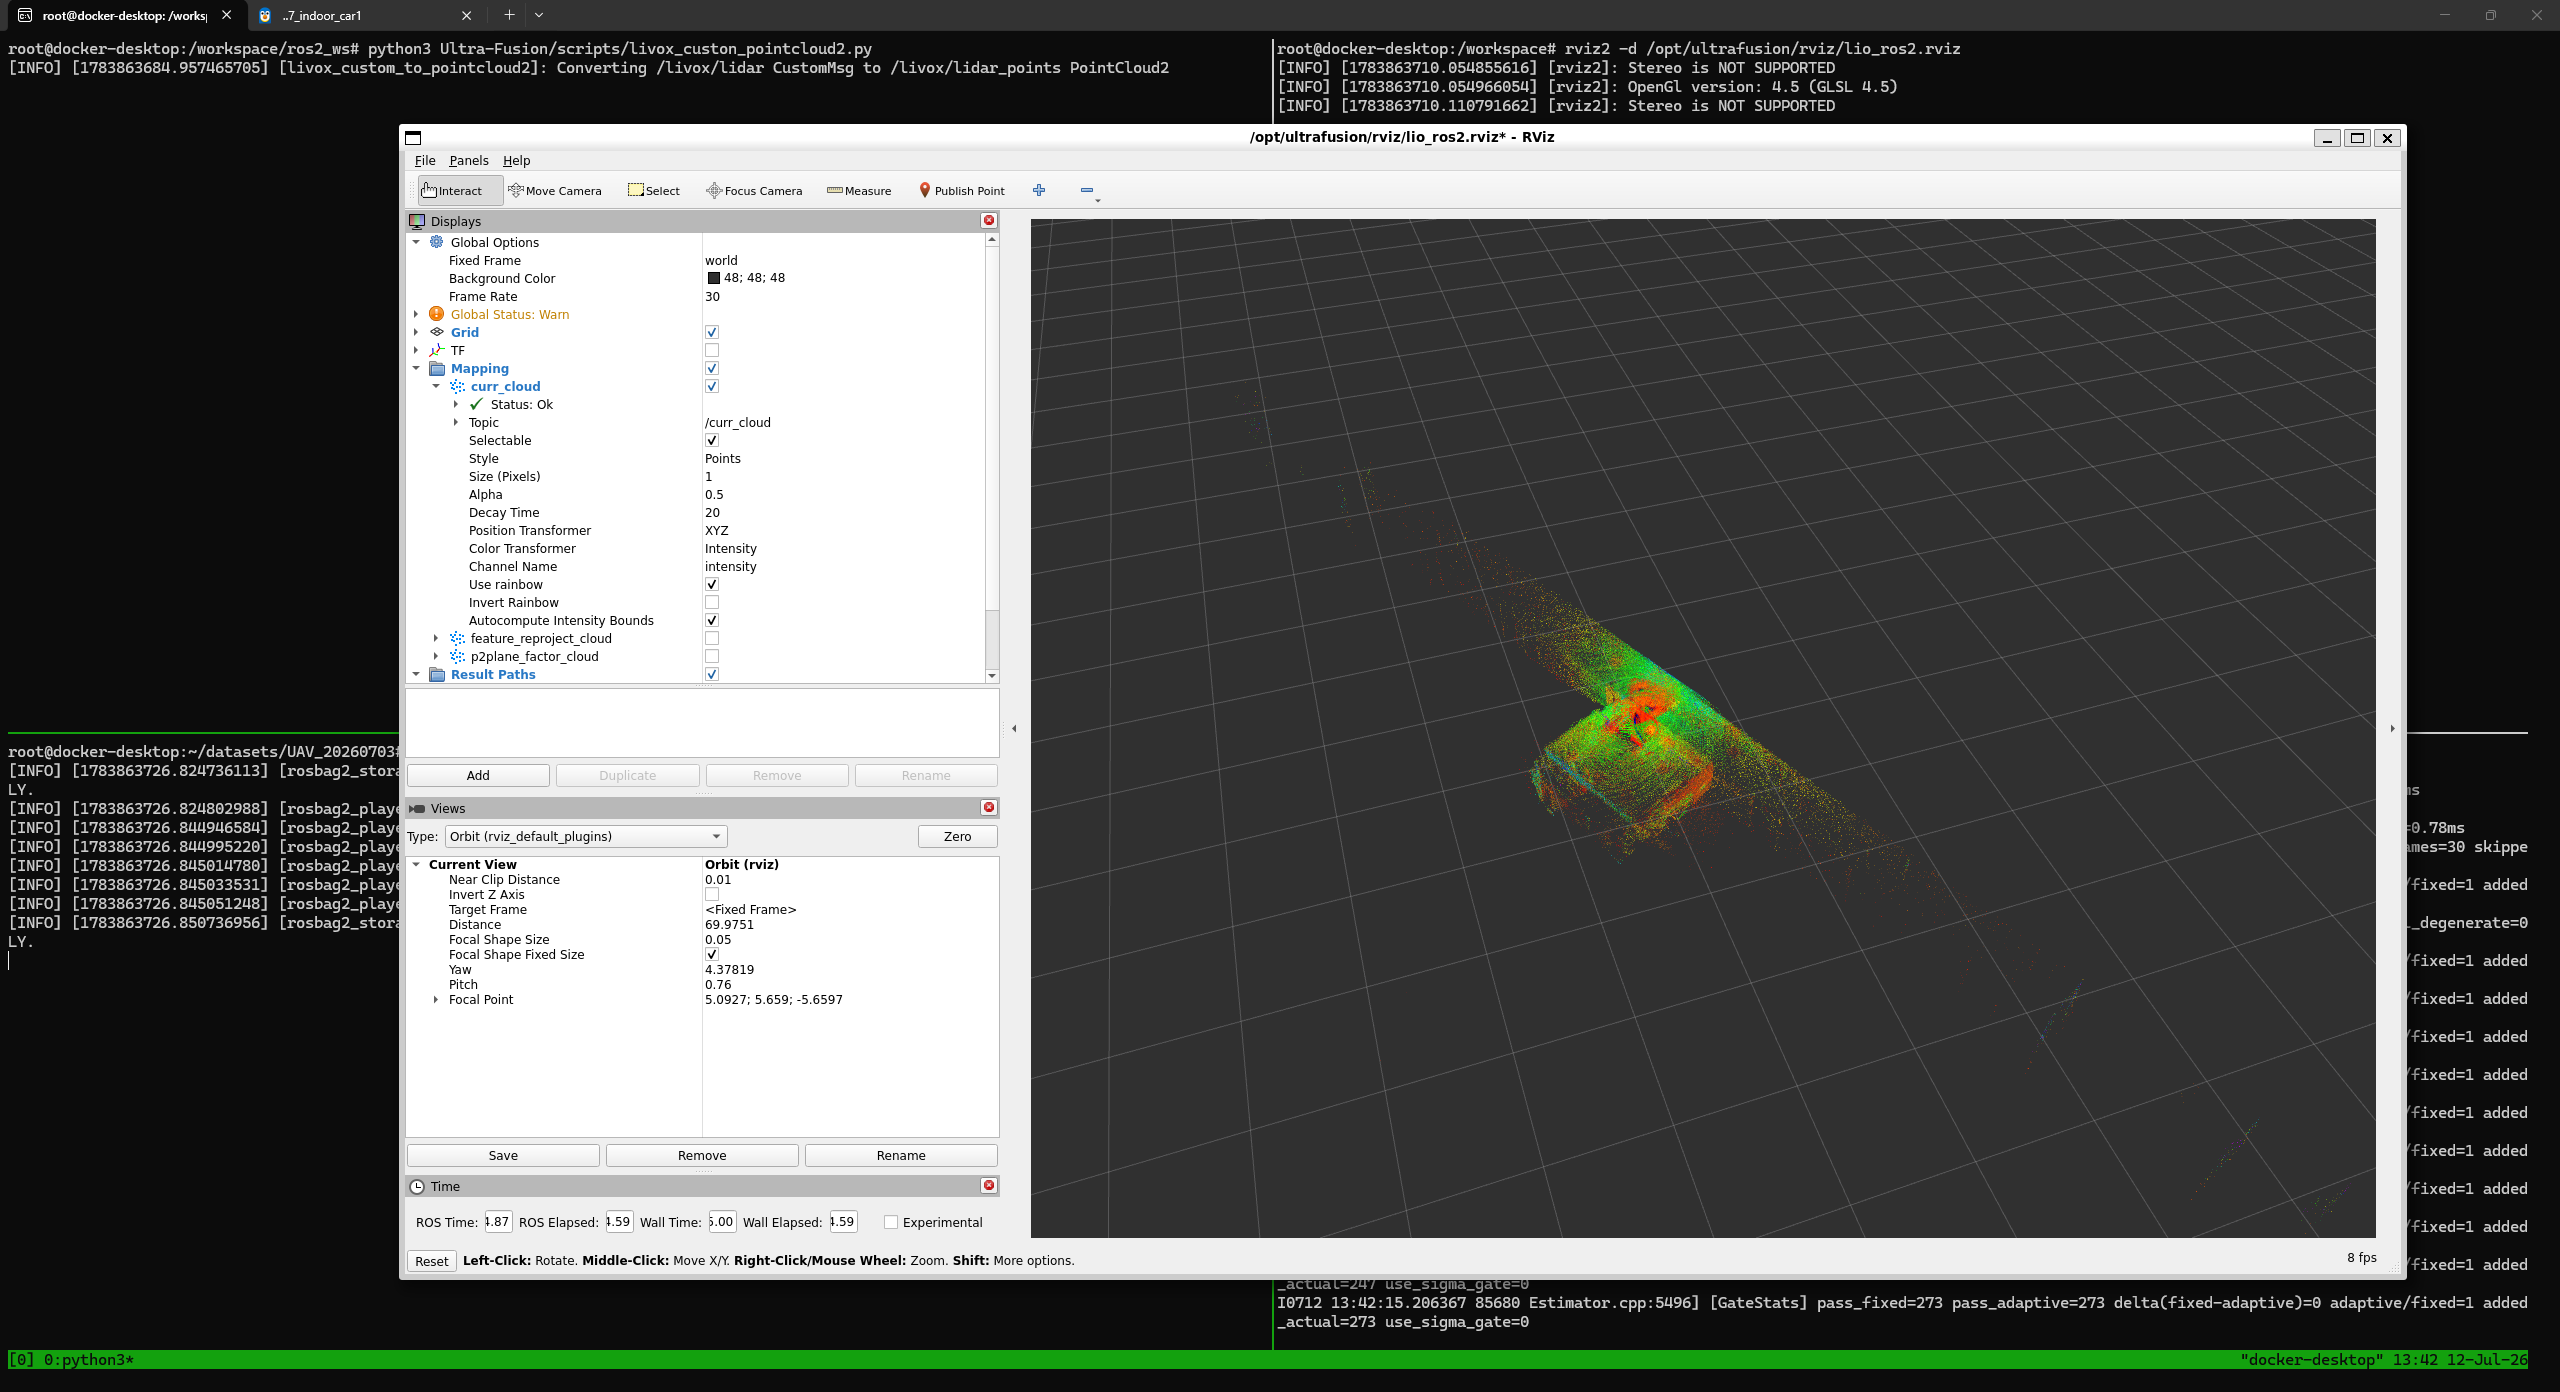
image-20260712215413541

其他

Tmux终端使用

1
2
# 安装
sudo apt install -y tmux

tmux 快捷键汇总表(按功能分类)

一、会话(Session)操作快捷键

快捷键 功能说明
Ctrl+b d 分离当前会话,后台保留运行
Ctrl+b s 列出所有会话,可切换选择
Ctrl+b $ 重命名当前会话

二、窗口(Window)操作快捷键

快捷键 功能说明
Ctrl+b c 创建新窗口,状态栏会同步显示多窗口信息
Ctrl+b p 按状态栏顺序,切换到上一个窗口
Ctrl+b n 切换到下一个窗口
Ctrl+b 快速切换到指定编号的窗口
Ctrl+b w 弹出窗口列表,按上下键选择切换
Ctrl+b , 重命名当前窗口

三、窗格(Pane)操作快捷键

快捷键 功能说明
Ctrl+b % 垂直划分,生成左右两个窗格
Ctrl+b “ 水平划分,生成上下两个窗格
Ctrl+b 按方向键,将光标切换到对应方向的其他窗格
Ctrl+b ; 光标切换到上一个窗格
Ctrl+b o 光标循环切换到下一个窗格
Ctrl+b x 关闭当前窗格
Ctrl+b ! 将当前窗格拆分为独立的新窗口
Ctrl+b z 切换当前窗格的全屏/还原状态
Ctrl+b q 显示所有窗格的编号

image-20260712215424085

下一篇:
Pxhawk-Jeston-Board使用教程及ROS2通信